Microsoft Entra as OIDC provider
This how-to describes how to configure Microsoft Entra as an OIDC provider for a tenant in an Avassa system. In the how-to we create a new tenant, an OIDC provider can of course be added to an existing tenant as well.
Prepare Azure and Entra
We need to prepare our Control Tower as an OIDC client in Azure/Entra.
App Registration
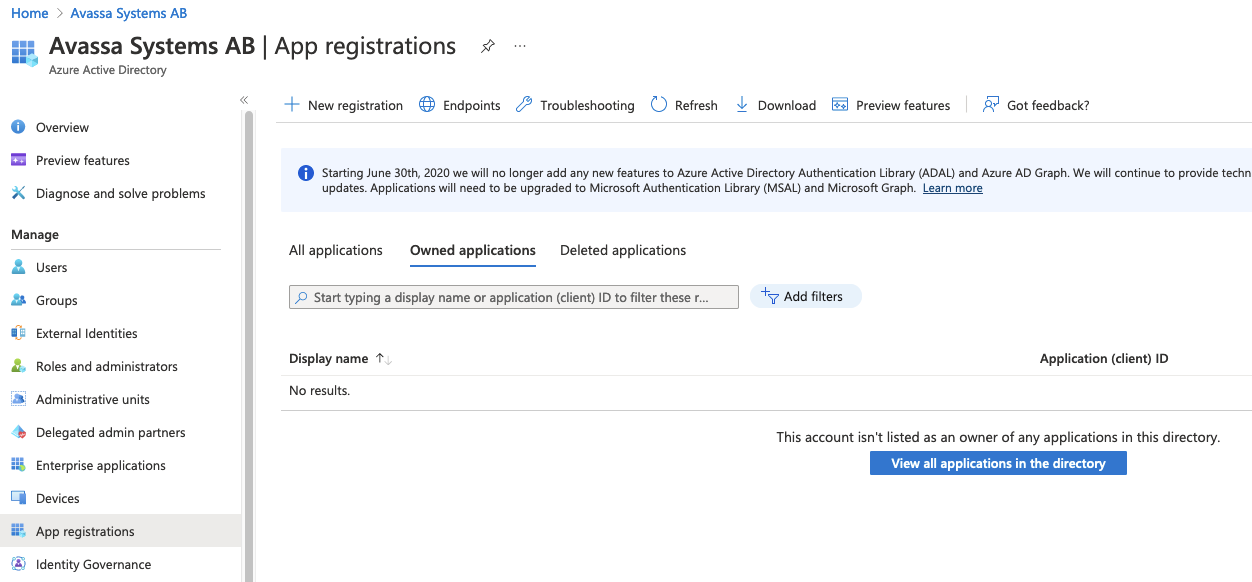
Click New registration
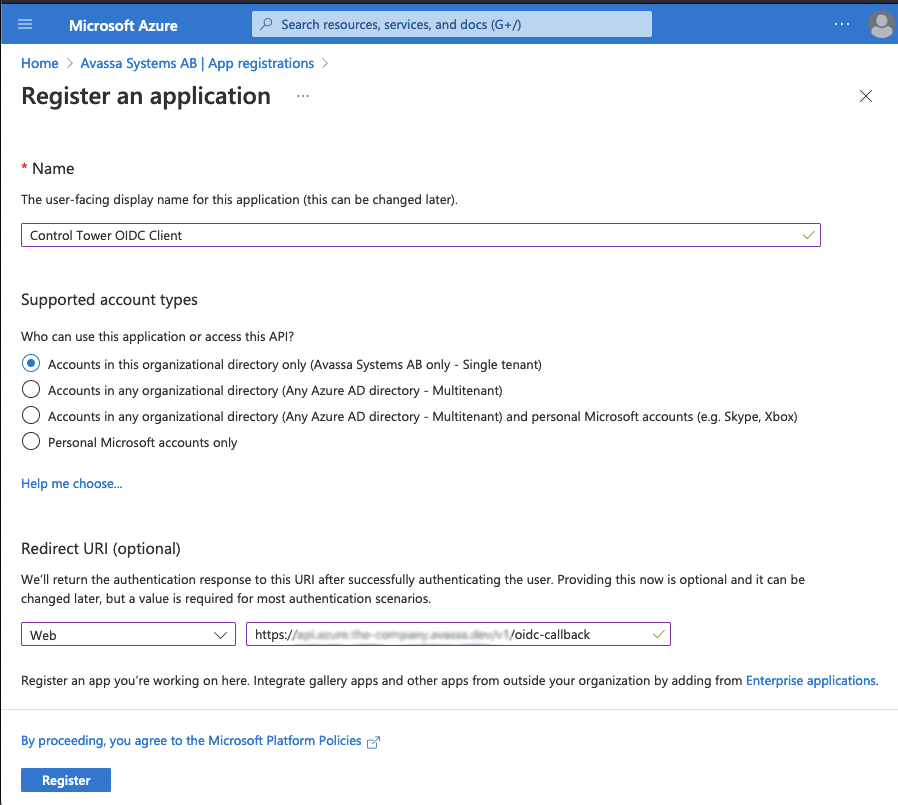
Make sure you add a redirect URI here, the path is: <env-name>.<org-name>.avassa.net/oidc-callback
After saving, you will see something like this, make a note of the Application (client) ID

Client Secret
Next create a new secret by clicking Client credentialsand add a client secret.
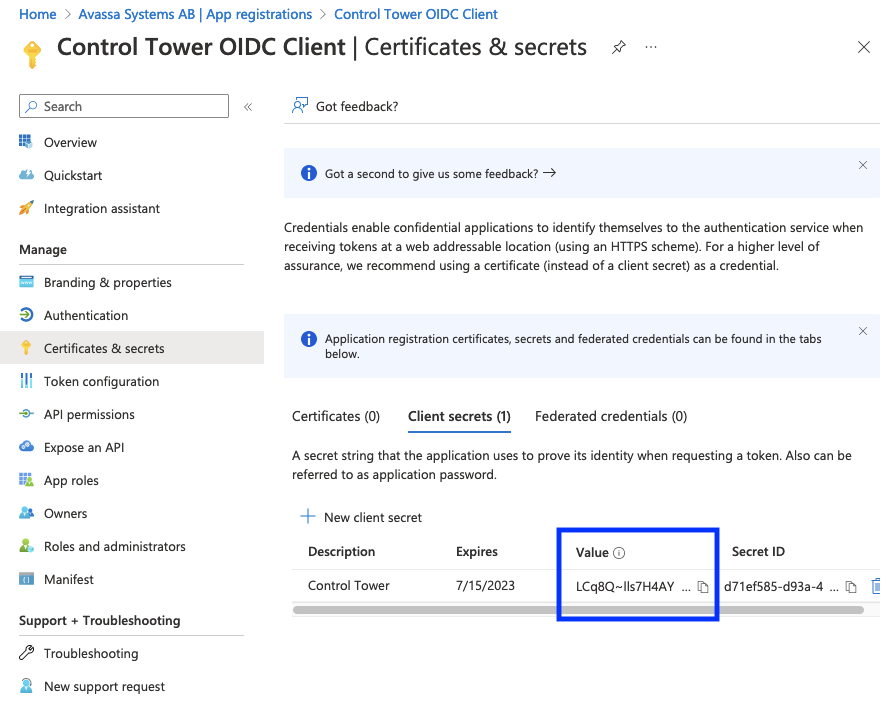
Note the Value of the secret.
The client secret has an expiry date, so you will have to refresh this.
You will see this in the system:logs topic:
<ERROR> 2025-10-02 07:17:31.434675Z control-tower/ip-10-20-20-1: Failed to grant oidc token: Message from OIDC server (401) {"error":"invalid_client","error_description":"AADSTS7000222: The provided client secret keys for app '...' are expired. Visit the Azure portal to create new keys for your app: https://aka.ms/NewClientSecret, or consider using certificate credentials for added security: https://aka.ms/certCreds.
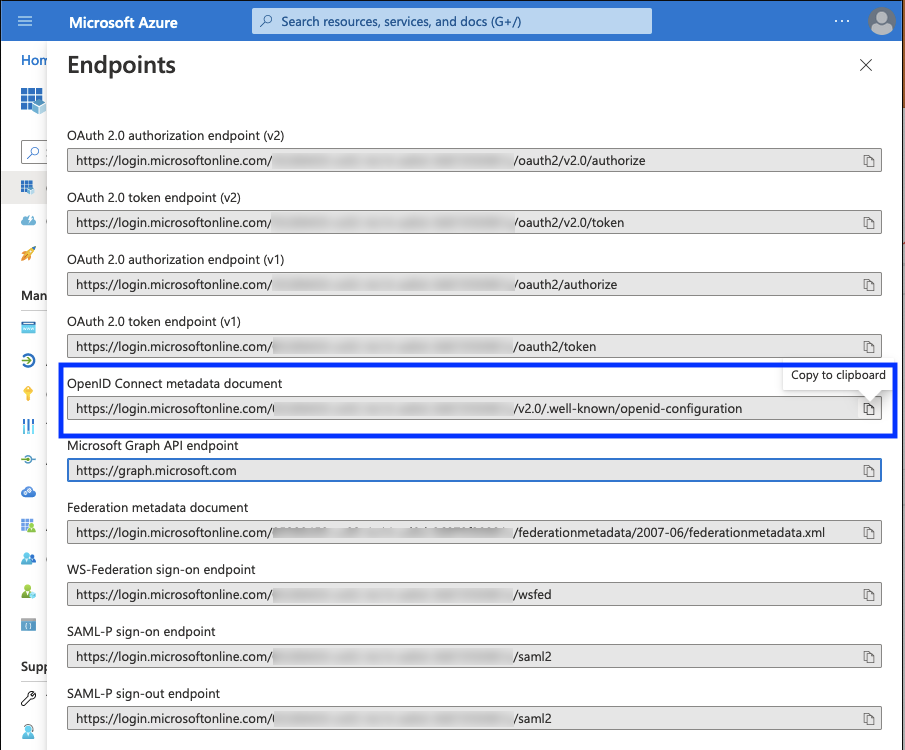
Endpoint URL
Next client Endpoints here:
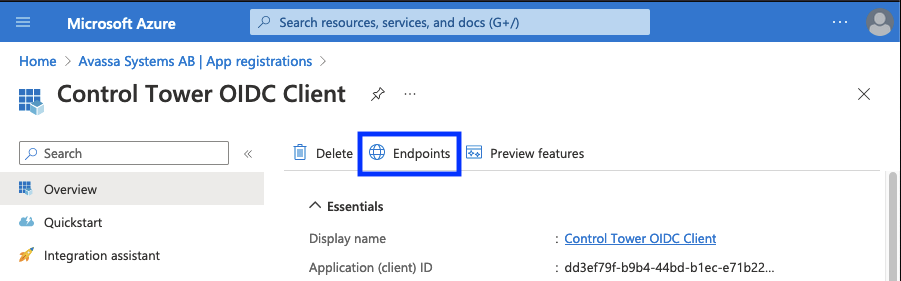
And note OpenID Connect metadata document
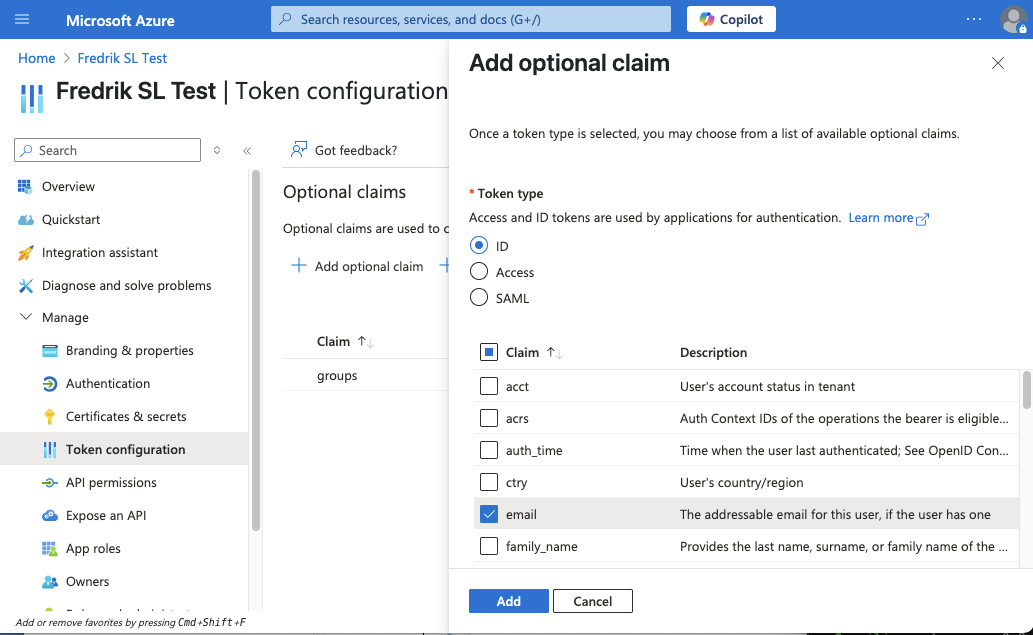
Add email claim
To make sure the email address is available in the Avassa system, we need to
add the email claim. Click Token configuration and then Add optional claim.
Select Token type: ID and then select email and click Add.
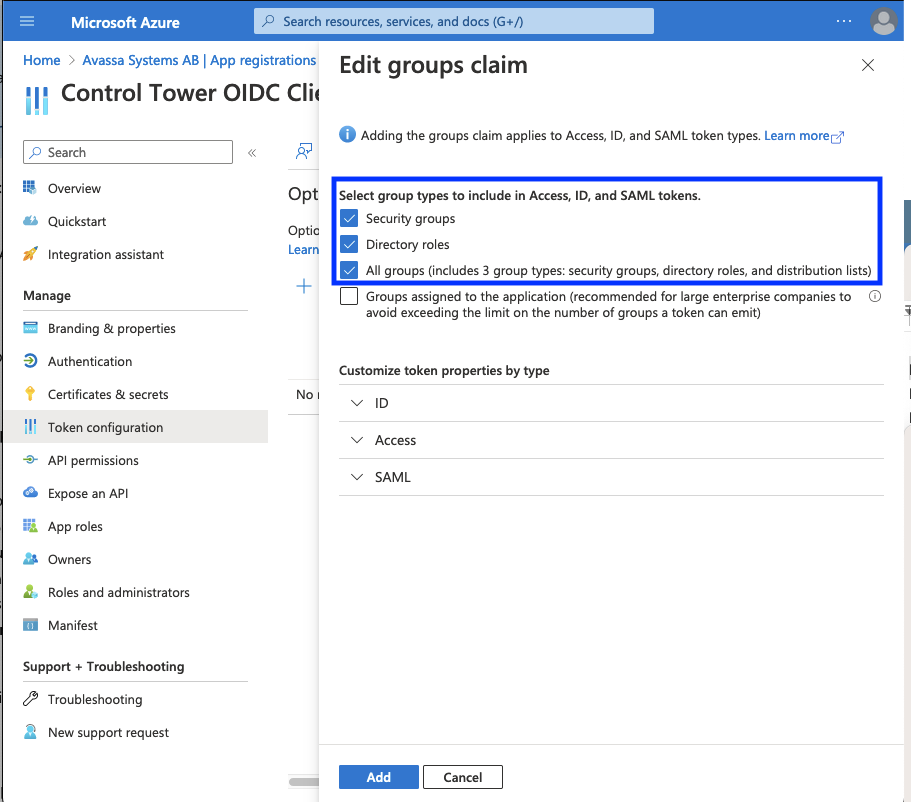
Add user groups claim
For this tutorial, we will map Entra groups to policies in the Avassa System. To add groups as a claim, select the app registration and add groups claim:
Group overage (more than ~200 groups)
Entra includes group memberships directly in the token's groups claim.
However, if a user is a member of more than approximately 150-200 groups,
Entra triggers group overage - the groups claim is omitted and replaced
with an indicator that groups must be fetched separately via Microsoft Graph.
Avassa handles this automatically. The User.Read delegated permission
(which most app registrations already have) is sufficient, since Avassa
calls /me/getMemberGroups on behalf of the signed-in user.
- Go to API permissions and verify that
User.Read(Microsoft Graph, Delegated) is listed and has consent granted. This is added by default for new app registrations. - If it is missing: click + Add a permission > Microsoft Graph > Delegated
permissions, search for
User.Read, click Add permissions, and grant consent.
Then make sure oidc-scopes on the OIDC role includes at least profile and
email (see role configuration below). These
are Graph-level scopes that cause Entra to issue the access token for Microsoft
Graph.
When this is configured, Avassa will detect that the access token is a
Microsoft Graph token and use it directly to call /me/getMemberGroups
to retrieve the user's group memberships. The flow looks like this:
User signs in via Entra
        |
        v
Avassa receives id_token + access_token
  - id_token:     aud = <client-id>, contains overage indicators
  - access_token: aud = Microsoft Graph (issued because oidc-scopes
                  includes profile/email which are Graph scopes)
        |
        |  POST /v1.0/me/getMemberGroups (with access_token)
        v
Microsoft Graph returns the user's security group memberships
        |
        v
Avassa uses the groups for role matching
When oidc-scopes includes Graph-level scopes like profile and email,
Entra issues the access token directly for Microsoft Graph
(audience 00000003-0000-0000-c000-000000000000). Avassa detects this and uses
the token as-is, without needing an OBO (On-Behalf-Of) exchange. The
User.Read permission (with consent) allows the token to call
/me/getMemberGroups.
If all your users have fewer than ~150 groups, no extra configuration
is needed - the groups claim will be included directly in the token.
To reduce the number of groups in the token, you can set
"groupMembershipClaims": "SecurityGroup" in the app manifest. This excludes
distribution lists and Microsoft 365 groups, which may bring the count below
the overage threshold.
Alternatives if group overage is still a problem:
- Limit groups per user - set
"groupMembershipClaims": "SecurityGroup"in the app manifest to exclude distribution lists and Microsoft 365 groups. If the user has fewer than ~150 security groups, thegroupsclaim fits in the token directly. - Allow sign-in without groups (lenient) - Avassa signs the user in but without group memberships. Role matching based on groups will not work. This is Avassa's default behaviour when group fetching fails - no explicit configuration is required.
Azure/Entra Information
You should now have the following values from Azure:
| client ID | dd3ef79f-b9b4-44bd-b1ec-e71b221e0e96 |
| client secret | LCq8Q~lls7H4AYpD-J2~dI1BjumZbbET8GXincAx |
| Discovery URL | https://login.microsoftonline.com/xxxxxxxx-xxxx-xxxx-xxxx-xxxxxxxxxxxx/v2.0/.well-known/openid-configuration |
Configure OIDC for an existing tenant
If there is an existing tenant, you can authenticate supctl to that tenant. In the instructions
below, replace supctl -t <tenant token> xxx with supctl xxx in the instruction below.
Configure OIDC for a new tenant
In this example we will call this tenant popcorn-inc.
supctl replace tenants popcorn-inc <<EOF
name: popcorn-inc
kind: application-owner
policies:
  - app-owner-tenant
EOF
Next we will generate a root token for this tenant.
Make sure you take note of the token below, it will be used in subsequent supctl calls below.
You can only call create-root once.
supctl do strongbox token create-root --name popcorn-inc
Warning: Providing --name on the command line is insecure. Consider using --name-prompt instead.
{
  "accessor": "c51e2c8d-1cab-4d36-9880-294bc5529059",
  "token": "6c1fa04e-463a-4e61-bcc9-fd1e072f16cc",
  "creation-time": "2023-01-16T11:36:10.549630Z"
}
Configure the OIDC provider
With the discovery URL, client ID and the secret from above, we can now create the oidc service.
NOTE 1: make sure allowed-redirect-uris match what you configured in Azure above.
NOTE 2: role-claim: groups will try to match all group names in the groups to oidc roles.
6c1fa04e-..is the token generated above
supctl -t 6c1fa04e-463a-4e61-bcc9-fd1e072f16cc replace strongbox authentication oidc-services microsoft-entra <<EOF
name: microsoft-entra
display-name: Microsoft Entra
# Replace me
discovery-url: https://login.microsoftonline.com/xxxxxxxx-xxxx-xxxx-xxxx-xxxxxxxxxxxx/v2.0/.well-known/openid-configuration
use-root-ca-certs: true
# Replace me
client-id: dd3ef79f-b9b4-44bd-b1ec-e71b221e0e96
# Replace me
client-secret: LCq8Q~lls7H4AYpD-J2~dI1BjumZbbET8GXincAx
verbose-logging: true
role-select:
  role-claim: groups
  allowed-redirect-uris:
      # Replace me
    - https://my-env.example.avassa.dev/oidc-callback
EOF
verbose-logging: true can be helpful while setting up and testing.
See troubleshooting for helpful logs.
Verbose logging should be disabled in production:
supctl -t 6c1fa04e-463a-4e61-bcc9-fd1e072f16cc merge strongbox authentication oidc-services microsoft-entra <<EOF
verbose-logging: false
EOF
Now we will create OIDC roles to match an Azure groups. Azure groups are sent
in the form of guids, you can find the roles in azure in the Groups menu,
there the group names and guid (Object Id) are listed.
dbb4bd8f-..is the Object Id for the Azure group.6c1fa04e-..is the token generated above
Here we match the dbb4bd8f-c8a9-45c1-a6d2-5456f2fcb6b9 group id to a root and user policy.
supctl -t 6c1fa04e-463a-4e61-bcc9-fd1e072f16cc create strongbox authentication oidc-services microsoft-entra roles <<EOF
name: dbb4bd8f-c8a9-45c1-a6d2-5456f2fcb6b9

# If the email claim is not present, deny access
required-claims:
  - email
# Map email claim to username in the Avassa system
claim-mappings:
  email: username
  name: fullname

oidc-scopes:
  - profile
  - email

# Map this group to the following policies
token-policies:
  - root
  - user
EOF
Claim mappings
In the above example we map email from Azure AD to username in the Avassa system. This will ensure
the email address is logged in the audit trail logs and rendered in the UI.
The fullname mapping is optional, it will be used to render the user's name in the UI.
Test Login
To login, go to your environment and enter the tenant name so see the login
options
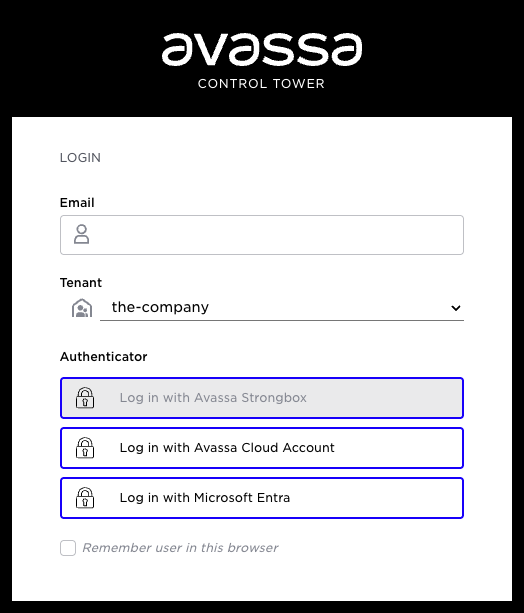
At this point you will be redirected to Azure and after logging in, redirected back into Control Tower.
Troubleshooting
In case login fails, you can find useful information in the following topics:
system:logssystem:audit-trail-log
supctl -t 6c1fa04e-463a-4e61-bcc9-fd1e072f16cc do volga topics system:logs consume --payload-only
Common issues
| Symptom | Likely cause | Action |
|---|---|---|
OIDC role-select claim missing: groups | User has >200 groups (overage) and Graph group fetch is not working | Follow the group overage steps above |
AADSTS65001 | Admin consent missing for a required permission | Grant admin consent in Azure Portal > API permissions |
AADSTS50013 in OBO flow | Access token is already a Graph token; OBO is not applicable | Ensure oidc-scopes includes profile and email (not api://.../access_as_user) |
AADSTS7000222 | Client secret has expired | Create a new secret in Azure Portal > Certificates & secrets |
Graph group fetch failed / Graph returns 403 | User.Read permission missing or not consented | Verify that User.Read is listed under API permissions with consent granted |