Orchestrating Virtual Machines
You can use the Avassa orchestration features to manage Virtual Machines at the edge. The functionality utilize Kernel-based Virtual Machine (KVM) on the edge hosts if available. KVM is a kernel module in Linux that allows it to function as a hypervisor enabling the host machine to run multiple, isolated virtual machines (VMs). It is available in most Linux distributions.
Avassa starts edge VMs from within a container, which acts both as a launching vehicle and a carrier of the data needed by the virtual machine. Virtual machines are launched by QEMU with KVM support enabled. The virtual machine inherits the resource constraints imposed on the container.
Prerequisites and preparations
In order to use the Avassa Virtual Machine features you need to make sure that the target hosts are prepared:
- Install KVM according to instructions for your host OS
- Enable access to the kvm device with
chmod +666 /dev/kvm
To persist this change, create a udev rule:
echo 'KERNEL=="kvm", MODE="0666"' > /etc/udev/rules.d/90-avassa-vm-kvm.rules
Validate that KVM is properly setup with
qemu-system-$(uname -m) -enable-kvm
A good excercise is to test to launch a VM using qemu with kvm
support enabled before starting to use Avassa to orchestrate the VM
across edge hosts.
In order for Avassa to place a VM application on edge hosts with KVM you need to setup a device discovery label on the corresponding sites with:
supctl create system settings <<EOF
device-labels:
  - label: kvm
    udev-patterns:
      - "KERNEL==\"kvm\""
EOF
This will result in a kvm label on hosts with KVM installed and you can then target your VM applications towards hosts with this label.
Network acceleration
Optionally, devices /dev/net/tun and /dev/vhost-net should be configured to
improve network performance for the VM. If these are not configured, then the
VM will run with user mode network increasing the CPU load and decreasing the
throughput.
- Make sure that the
tunmodule and thevhost_netmodule are inserted in the Linux kernel:
modprobe tun
modprobe vhost_net
To persist this change, instruct systemd to insert these modules at startup:
cat > /etc/modules-load.d/90-avassa-vm.conf <<EOF
tun
vhost_net
EOF
- Make sure read-write access is granted to the user inside the container
chmod +666 /dev/net/tun /dev/vhost-net
To persist this change, create a udev rule:
cat > /etc/udev/rules.d/90-avassa-vm-net.rules <<EOF
KERNEL=="tun", MODE="0666"
KERNEL=="vhost-net", MODE="0666"
EOF
- Declare these devices in the Avassa platform's configuration to be able to refer to them from the application specification:
supctl merge system settings <<EOF
device-labels:
  - label: tun
    udev-patterns:
      - "KERNEL==\"tun\""
  - label: vhost-net
    udev-patterns:
      - "KERNEL==\"vhost-net\""
EOF
Overview
The steps to orchestrate VMs using Avassa starts with preparing a container image with the following layers
- A base Linux image that will be used to launch the VM. Typically
registry.gitlab.com/avassa-public/vm-orchestration:baseshould be used. - Provide the initial VM image in one of the following ways:
- copy the VM disk image into the container image
- specify
VM_IMAGE_URLenvironment variable to specify where the image should be downloaded from - implement custom logic for acquiring the initial image by replacing the get-image-hook script with the alternative implementation.
- OPTIONAL - Add additional packages to the base image if needed
- OPTIONAL - Customize the launch script by:
- providing custom values for the environment variables
- replacing designated hook scripts with custom logic:
That gives you a container that can be used in an Avassa application specification. The Docker file could look something like this (from the Ubuntu example we provide):
# (1) Base image to launch VM
FROM registry.gitlab.com/avassa-public/vm-orchestration:base

# (2) Provide VM image
ENV VM_IMAGE_NAME=jammy-server-cloudimg-amd64-disk-kvm.img
ENV VM_IMAGE=/image/$VM_IMAGE_NAME
ADD https://cloud-images.ubuntu.com/jammy/current/$VM_IMAGE_NAME $VM_IMAGE

# (3) Install additional packages
RUN apk add --no-cache qemu-hw-display-virtio-vga

# (4) Customize environment variables
ENV VM_GRAPHICS=virtio-vga
where #3 and #4 above may be left out. In the example above the Docker file just adds the VM file for a Ubuntu VM which we will use later in this tutorial.
The Avassa vm-orchestration:base image is based on an alpine image
with the following additions:
- Additional necessary OS packages such as
qemu-system, UEFI firmware, networking tools etc to be able to serve as both the launch container for the VM, but also controlling the integration with the Avassa Cloud platform. - Launch script,
launch.sh, to prepare and launch the VM, which also serves as the entrypoint of the container. - Management scripts :
console.sh, to get console access to the VMmonitor.sh, to get QEMU monitor access for inspecting the state of the machine and making runtime changes
You can find more details on the base image and the associated launch
and console scripts in the README files in the vm-orchestration repository
.
When you orchestrate native container applications in Avassa you
have the structure: application - services - containers. With VMs,
a service has a part vm instead of containers. In the vm part,
configuration for both the VM and the container launching the VM is
added. Assume you build a container as outlined above named
my-vm. You can then define an Avassa application according to:
name: vmtest
services:
  - name: vmtest-service
    mode: replicated
    replicas: 1
    vm:
      name: test-vm
      container-image: my-vm
Note: the example above assumes you have pushed the container to the Control Tower registry, hence just a name rather than a URL.
When it comes to the initial VM image you have several options how to
handle the distribution (see also the README file
in the repository):
- Embed the VM image in the container. The benefit is that the initial VM image will be cached at the sites.
- Let the launch script download it from a URL. This will keep the container image small, but requires that the edge sites have network access to the repository. Furthermore the VM image will not be cached or replicated at the sites so connectivity is needed for fail-over etc.
- Let the launch script create an empty disk image and distribute an installation media in one of the ways suggested above (built into the container image or download at startup) to partition and install the desired OS to the VM disk.
Example: Ubuntu VM
In this introductory example we will orchestrate a Ubuntu VM to edge sites. We will embed the image into the container. The source files for this example is available at Ubuntu VM Orchestration . (There is also a corresponding Windows VM example).
Download this repository to a machine used to build the container image.
The steps we will guide you trough are
- Prepare the container image, launch and console scripts
- Define the application specification and deploy
- Check logs and console access
Prepare image
cd to the /vm-orchestration/ubuntu downloaded above.
Build the image using the provided Docker file that uses the Avassa base image:
docker build -f Dockerfile.inlined -t avassa/ubuntu-jammy-server-amd64 .
You can test to run this VM on a target edge host with:
mkdir -p data
docker run --init \
    --mount type=bind,source=./data,target=/data \
    --device /dev/kvm \
    --name ubuntu-vm \
    avassa/ubuntu-jammy-server-amd64
The VM's serial console in this case should be available using the following command:
docker exec -ti ubuntu-vm ./console.sh
Now we need to make this container image available for Control Tower. There are to ways to do this:
- upload it to your container registry of choice and refer to the URL in the application specification
- upload it to the Control Tower embedded registry
In this example we will upload the image to the Control Tower registry. Assume
your Control Tower URL is test.example.avassa.net. To push the container
image to your Control Tower registry you do the following commands, (assuming
you have a Control Tower local user with the policy allowing push).
docker login -u <username> -p <password> registry.test.example.avassa.net
docker tag avassa/ubuntu-jammy-server-amd64 registry.test.example.avassa.net/avassa/ubuntu-jammy-server-amd64
docker push registry.test.example.avassa.net/avassa/ubuntu-jammy-server-amd64
You can inspect your Control Tower repositories with:
% supctl show image-registry repositories
Note that this container image is of substantial size and you might want to delete the application after testing.
Deploy the VM application
We can now define the application specification:
name: ubuntu-server-app
version: 1.0.0
services:
  - name: ubuntu-server-service
    mode: replicated
    replicas: 1
    volumes:
      - name: disk
        persistent-volume:
          size: 10GiB
          file-mode: "755"
          file-ownership: 0:0
    vm:
      name: ubuntu-server-vm
      container-image: avassa/ubuntu-jammy-server-amd64
      devices:
        device-labels:
          - kvm
          - tun
          - vhost-net
      mounts:
        - volume-name: disk
          mount-path: /data
      memory: 2GiB
      cpus: 2
      container-env:
        VM_BOOT_DISK_SIZE: 10G
      cloud-init:
        user-data: |
          #cloud-config
          users:
          - default
          - name: joe
            gecos: Joe Smith
            shell: /bin/bash
            groups: [ sudo ]
            lock_passwd: false
            plain_text_passwd: verysecret
          runcmd:
            - sed -i -e 's/KbdInteractiveAuthentication\s*no/KbdInteractiveAuthentication yes/g' /etc/ssh/sshd_config
            - systemctl restart ssh
        meta-data: |
          instance-id: my-id-012345
          local-hostname: avassa-vm.local
          cloud-name: avassa-cloud
          variant: avassa-vm
    network:
      ingress-ip-per-instance:
        protocols:
          - name: tcp
            port-ranges: "22"
      outbound-access:
        allow-all: true
The first thing to notice is that the service comprises a vm
"ubuntu-server-vm". The service refers to the container image we
built in the steps above.
Then follows a cloud-init section that passes variables to the launch
script that generates cloud init files. For example the user-data
field is mapped to the variable VM_CLOUD_INIT_USER_DATA according to
the
cloud init documentation
The cloud init sets up an initial user joe we will use for SSH login.
Finally ingress ports are configured for SSH access.
Make sure you have an edge site with a KVM-enabled host and that you have configured the device label. You can validate this by inspecting the site in the Control Tower User Interface:
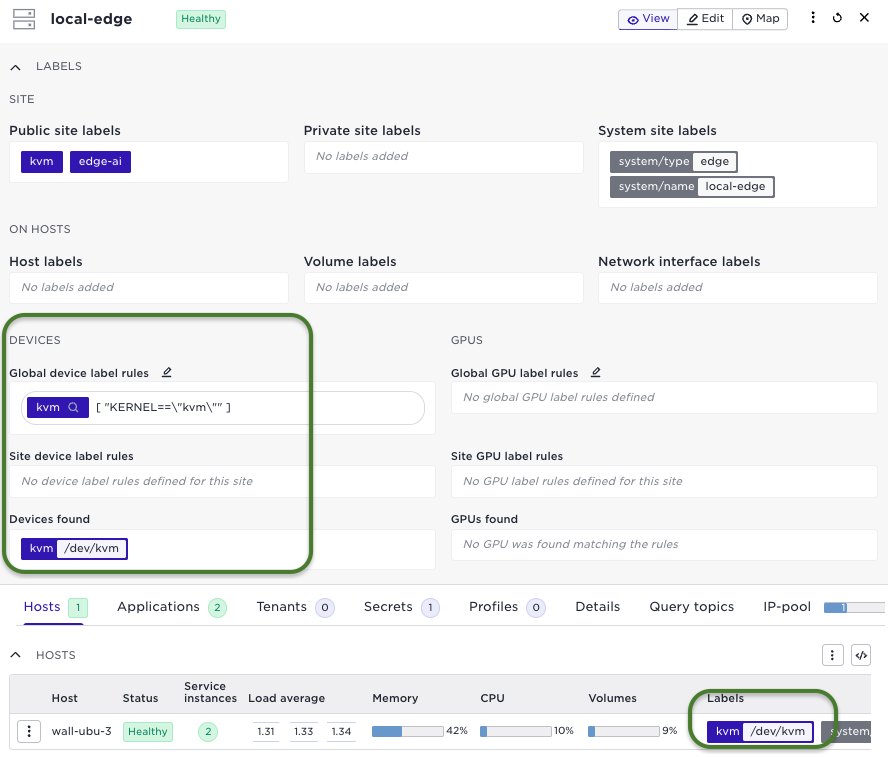
For testing purpose it might also be convenient to assign a tag to the site, for example "kvm", to make it easy to define the site as a target for your deployment. Now just create a deployment with the application specification and use the match labels expression:
name: vm-deployment
application: ubuntu-server-app
application-version: 1.0.0
placement:
  match-site-labels: kvm
Voila, the ubuntu VM will now start on that site:
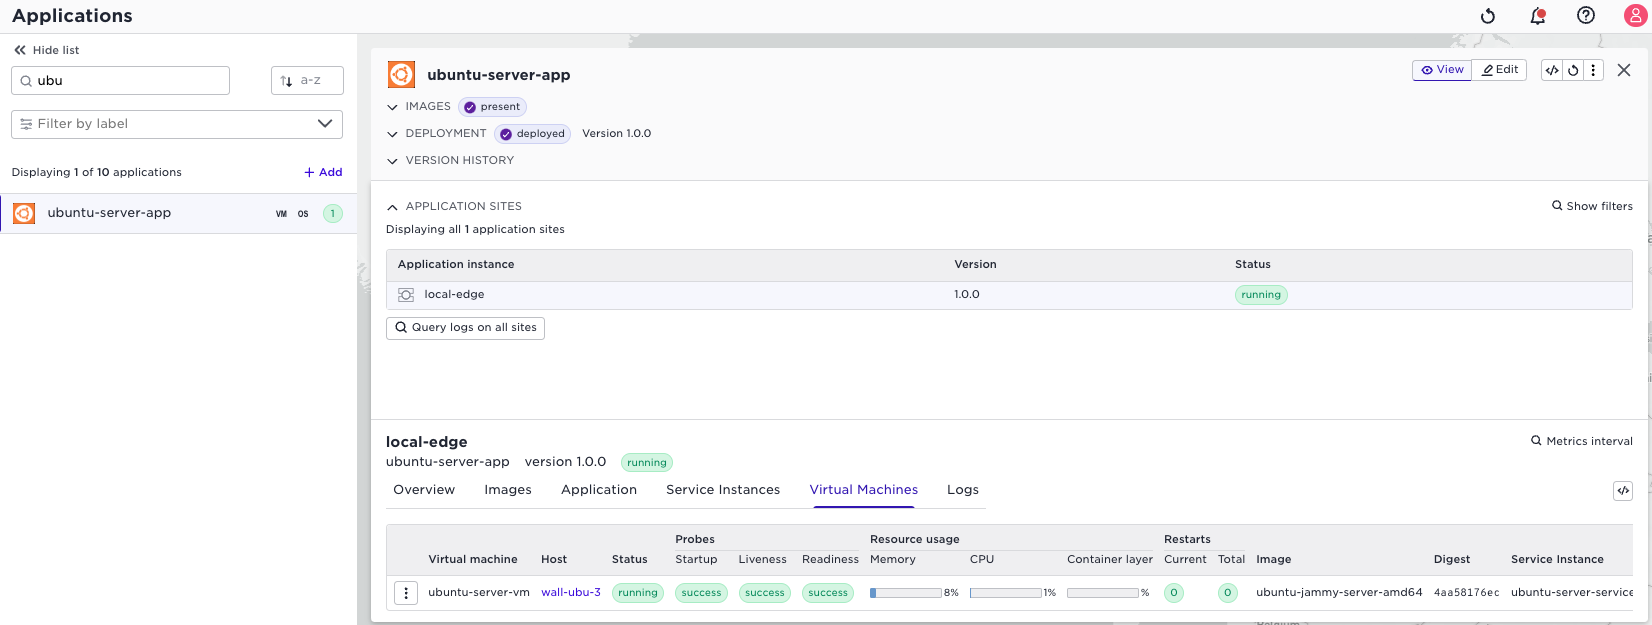
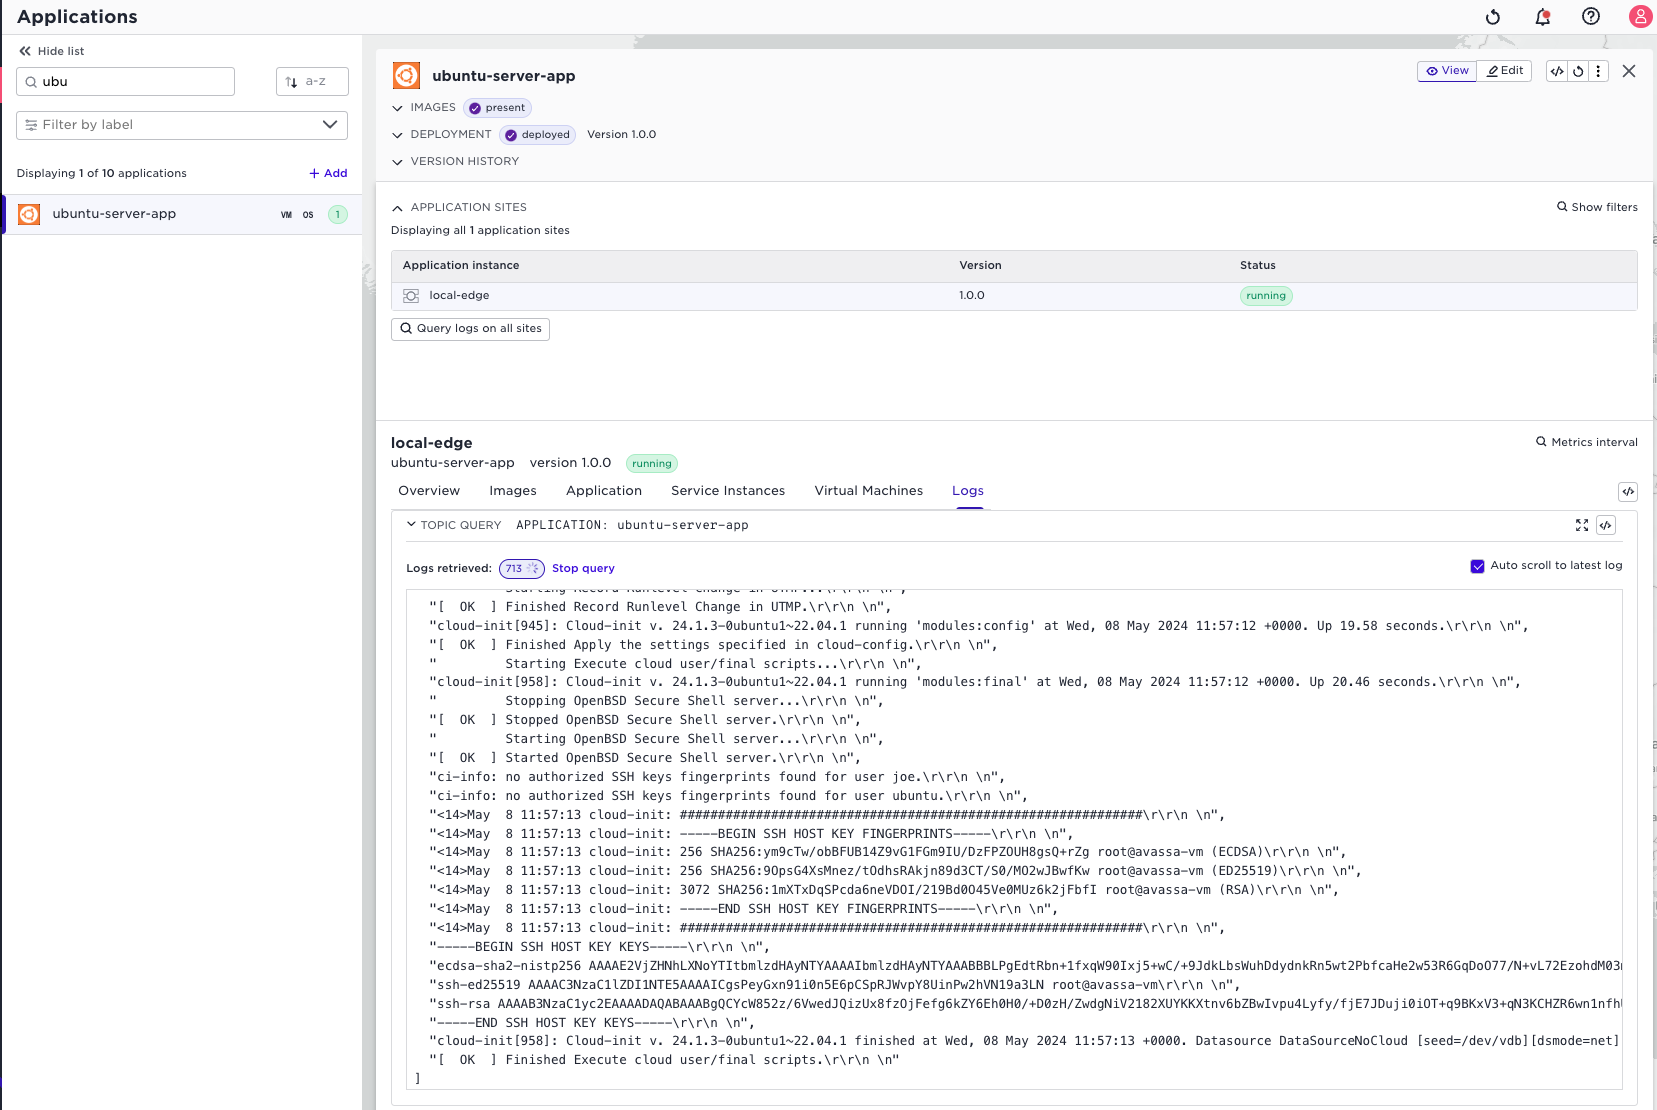
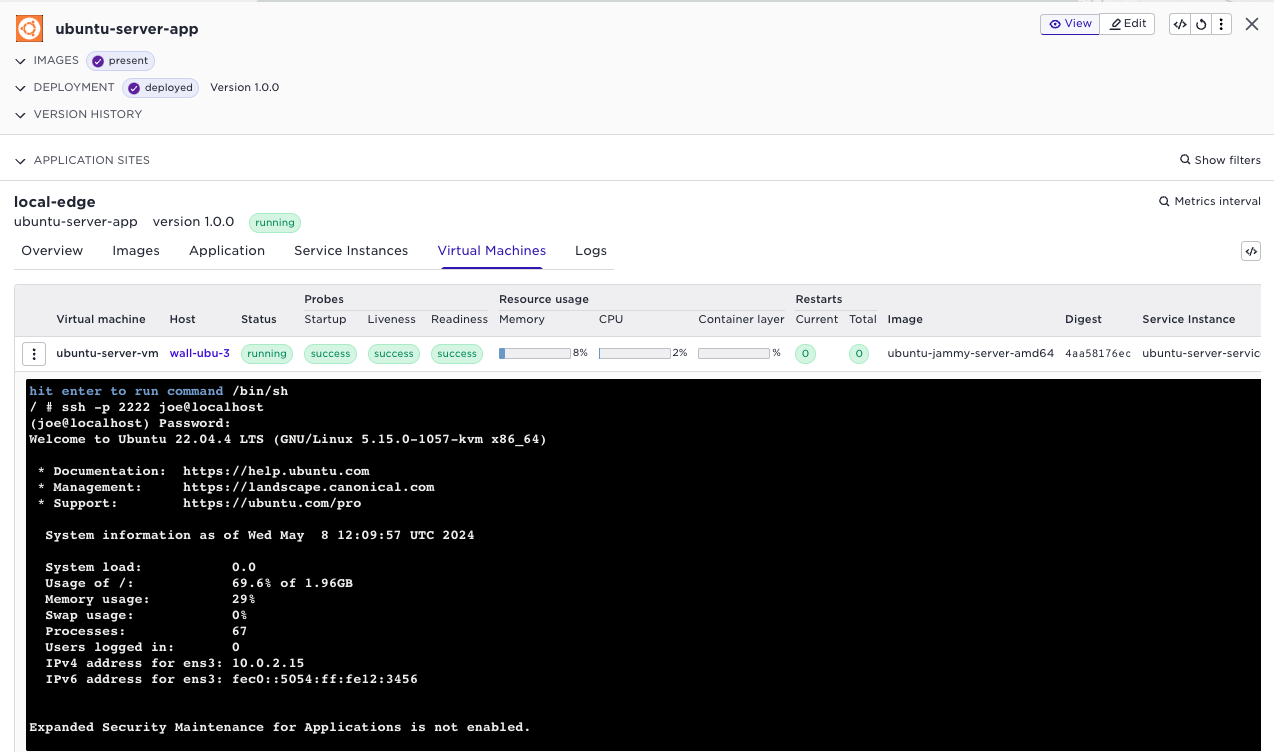
View logs, and console access
You can use the standard Avassa tools to inspect the VM logs:
You can also use the terminal to ssh to the VM. The cloud init part in
the application specification created a user joe.
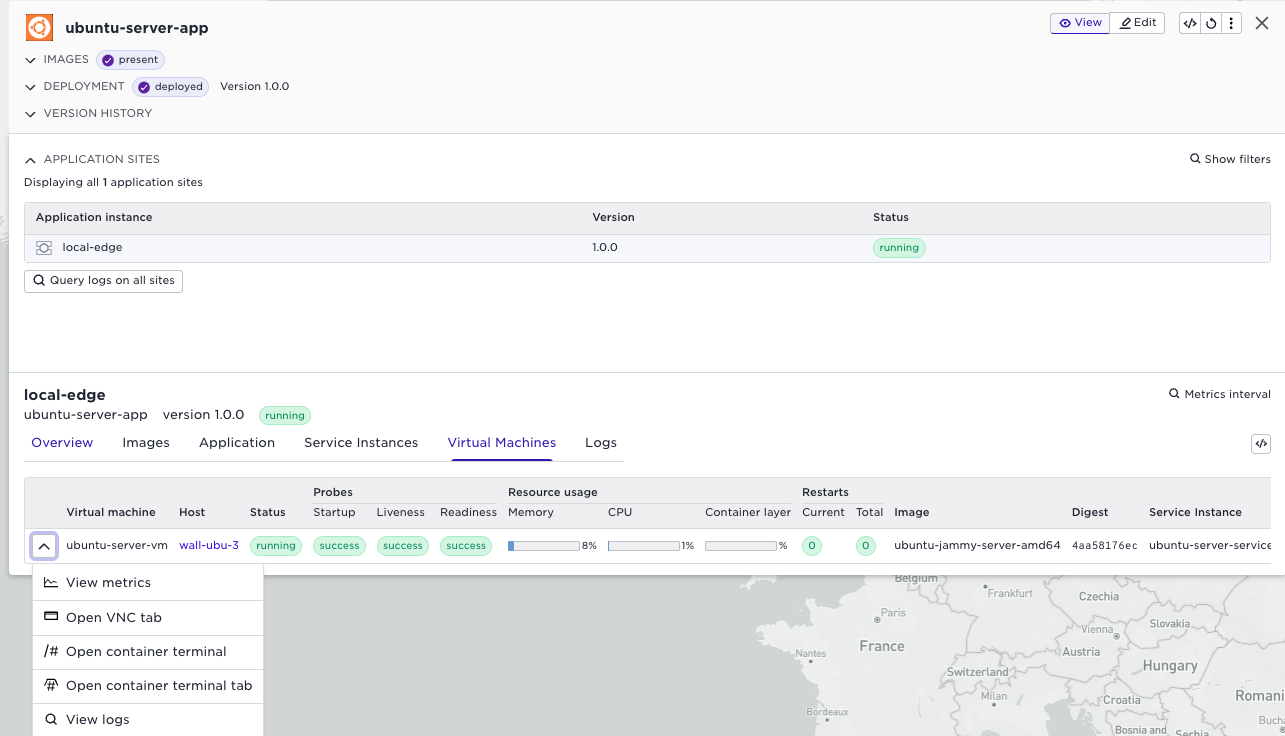
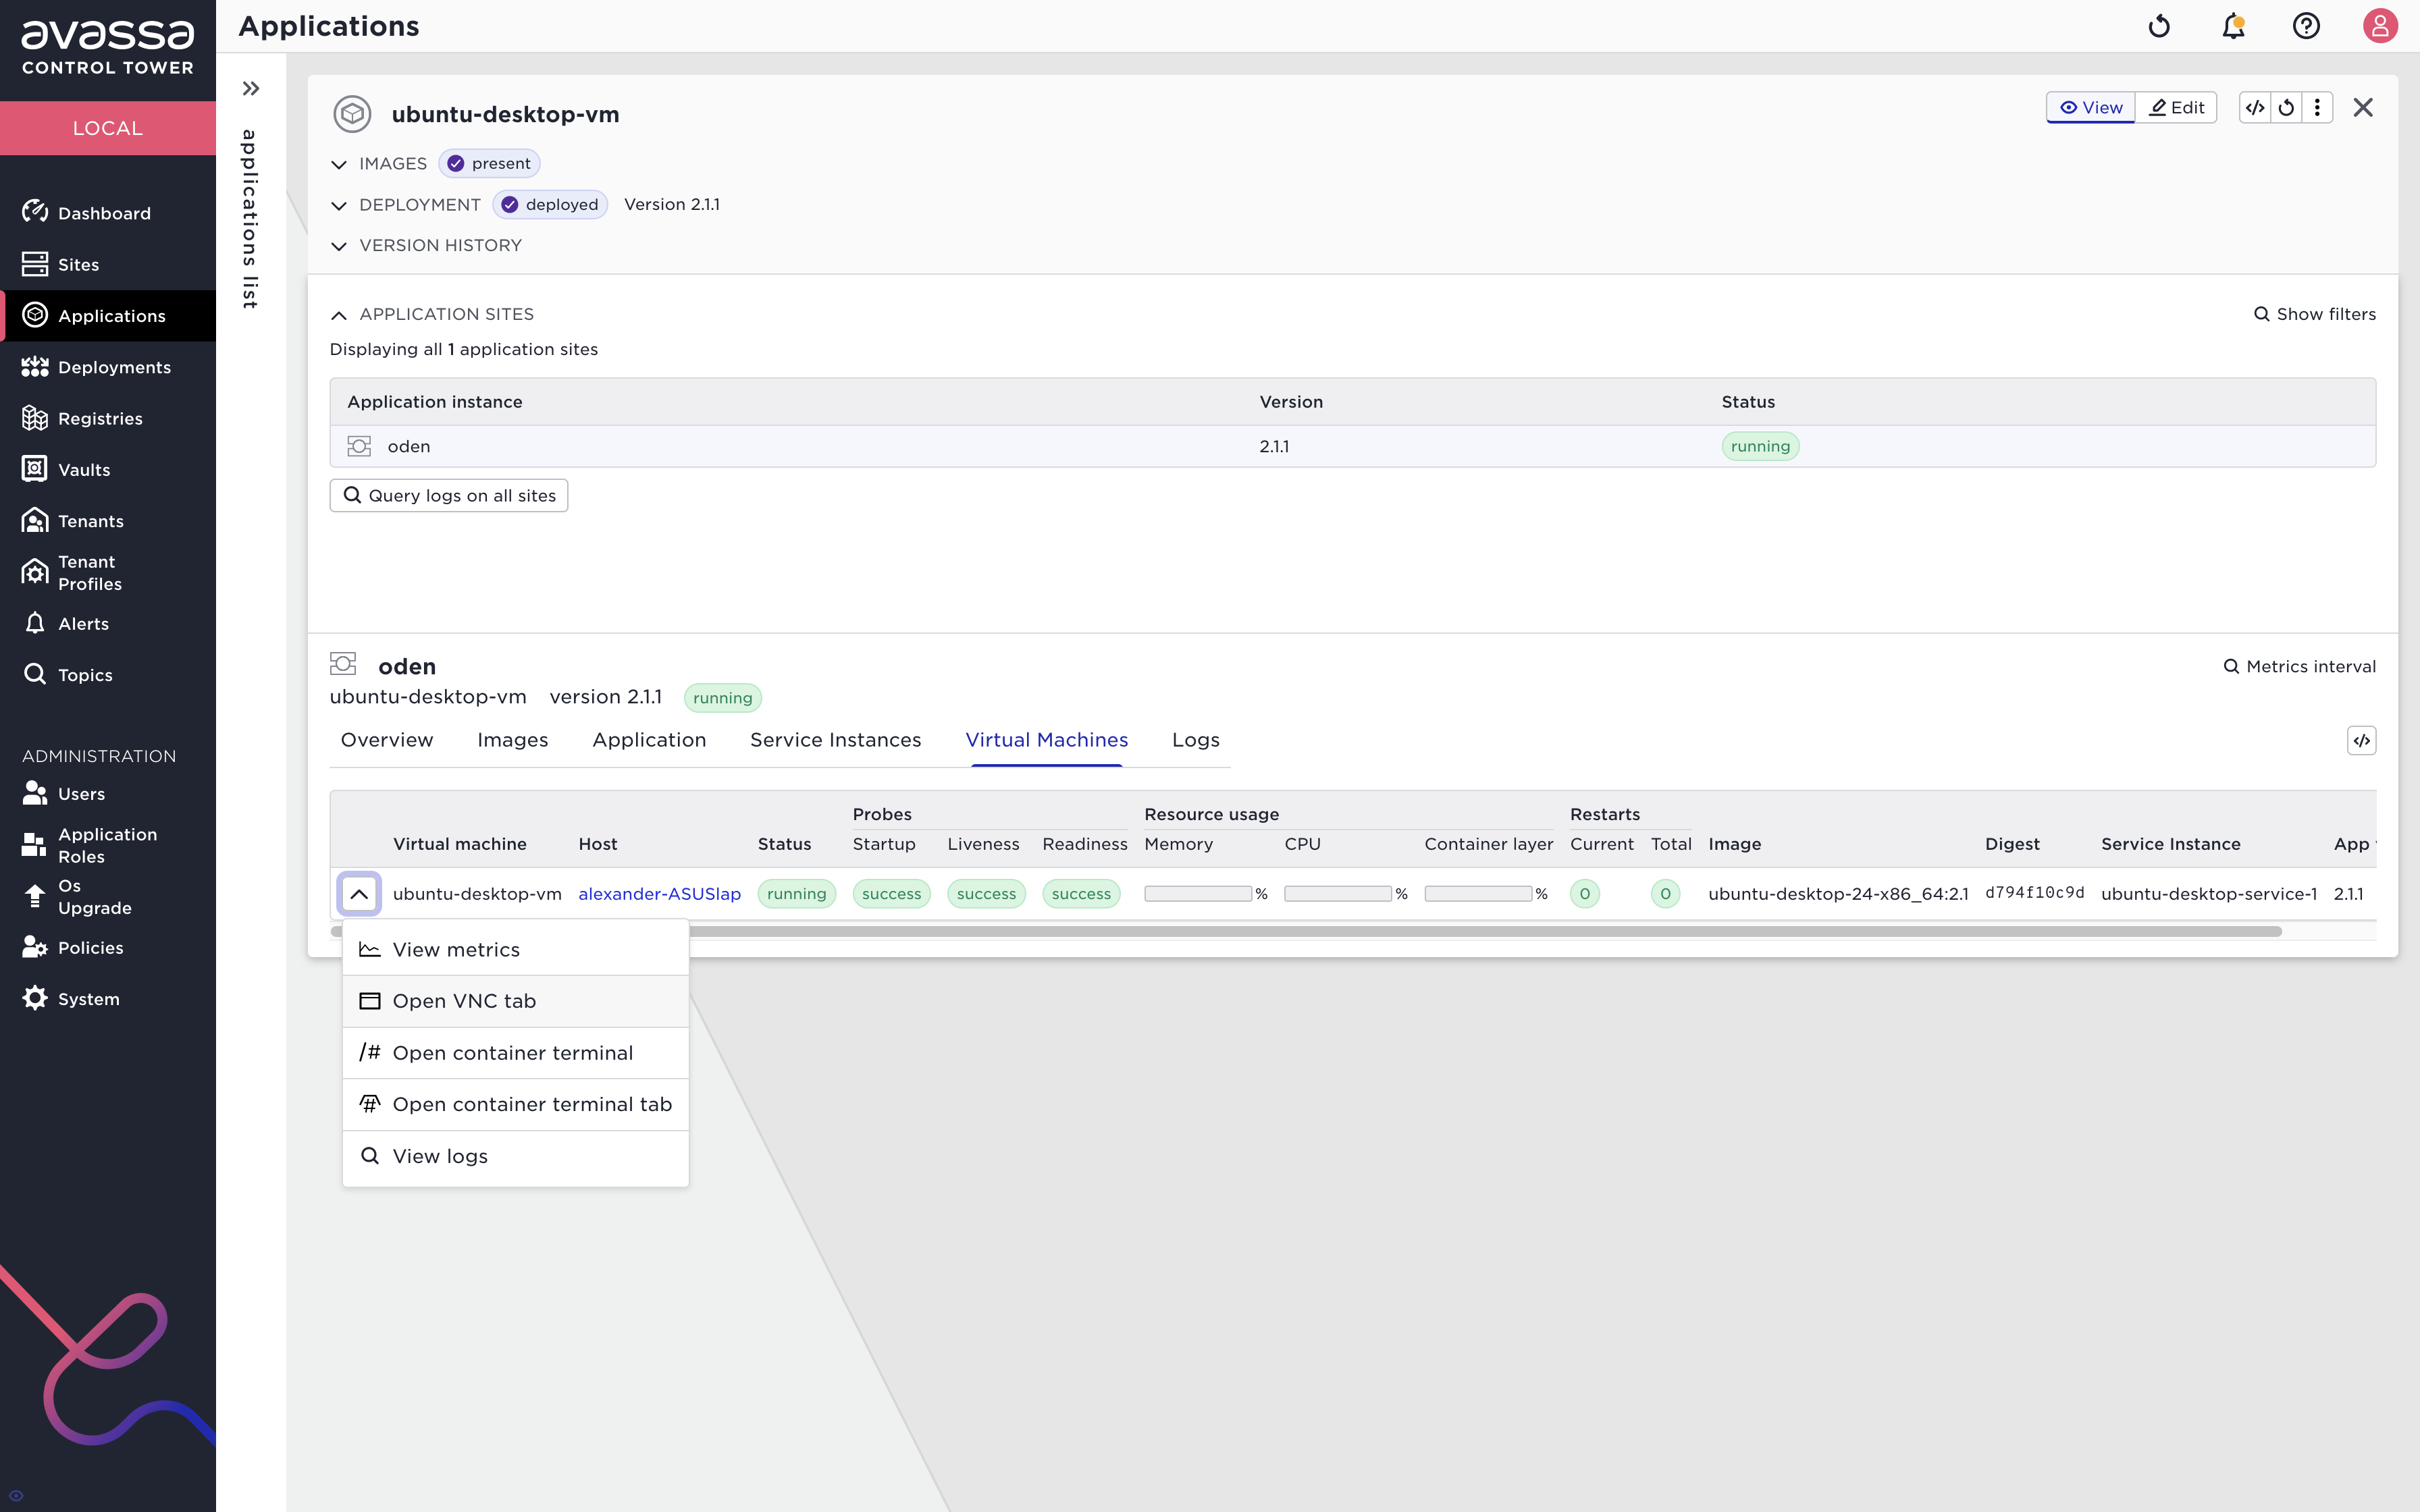
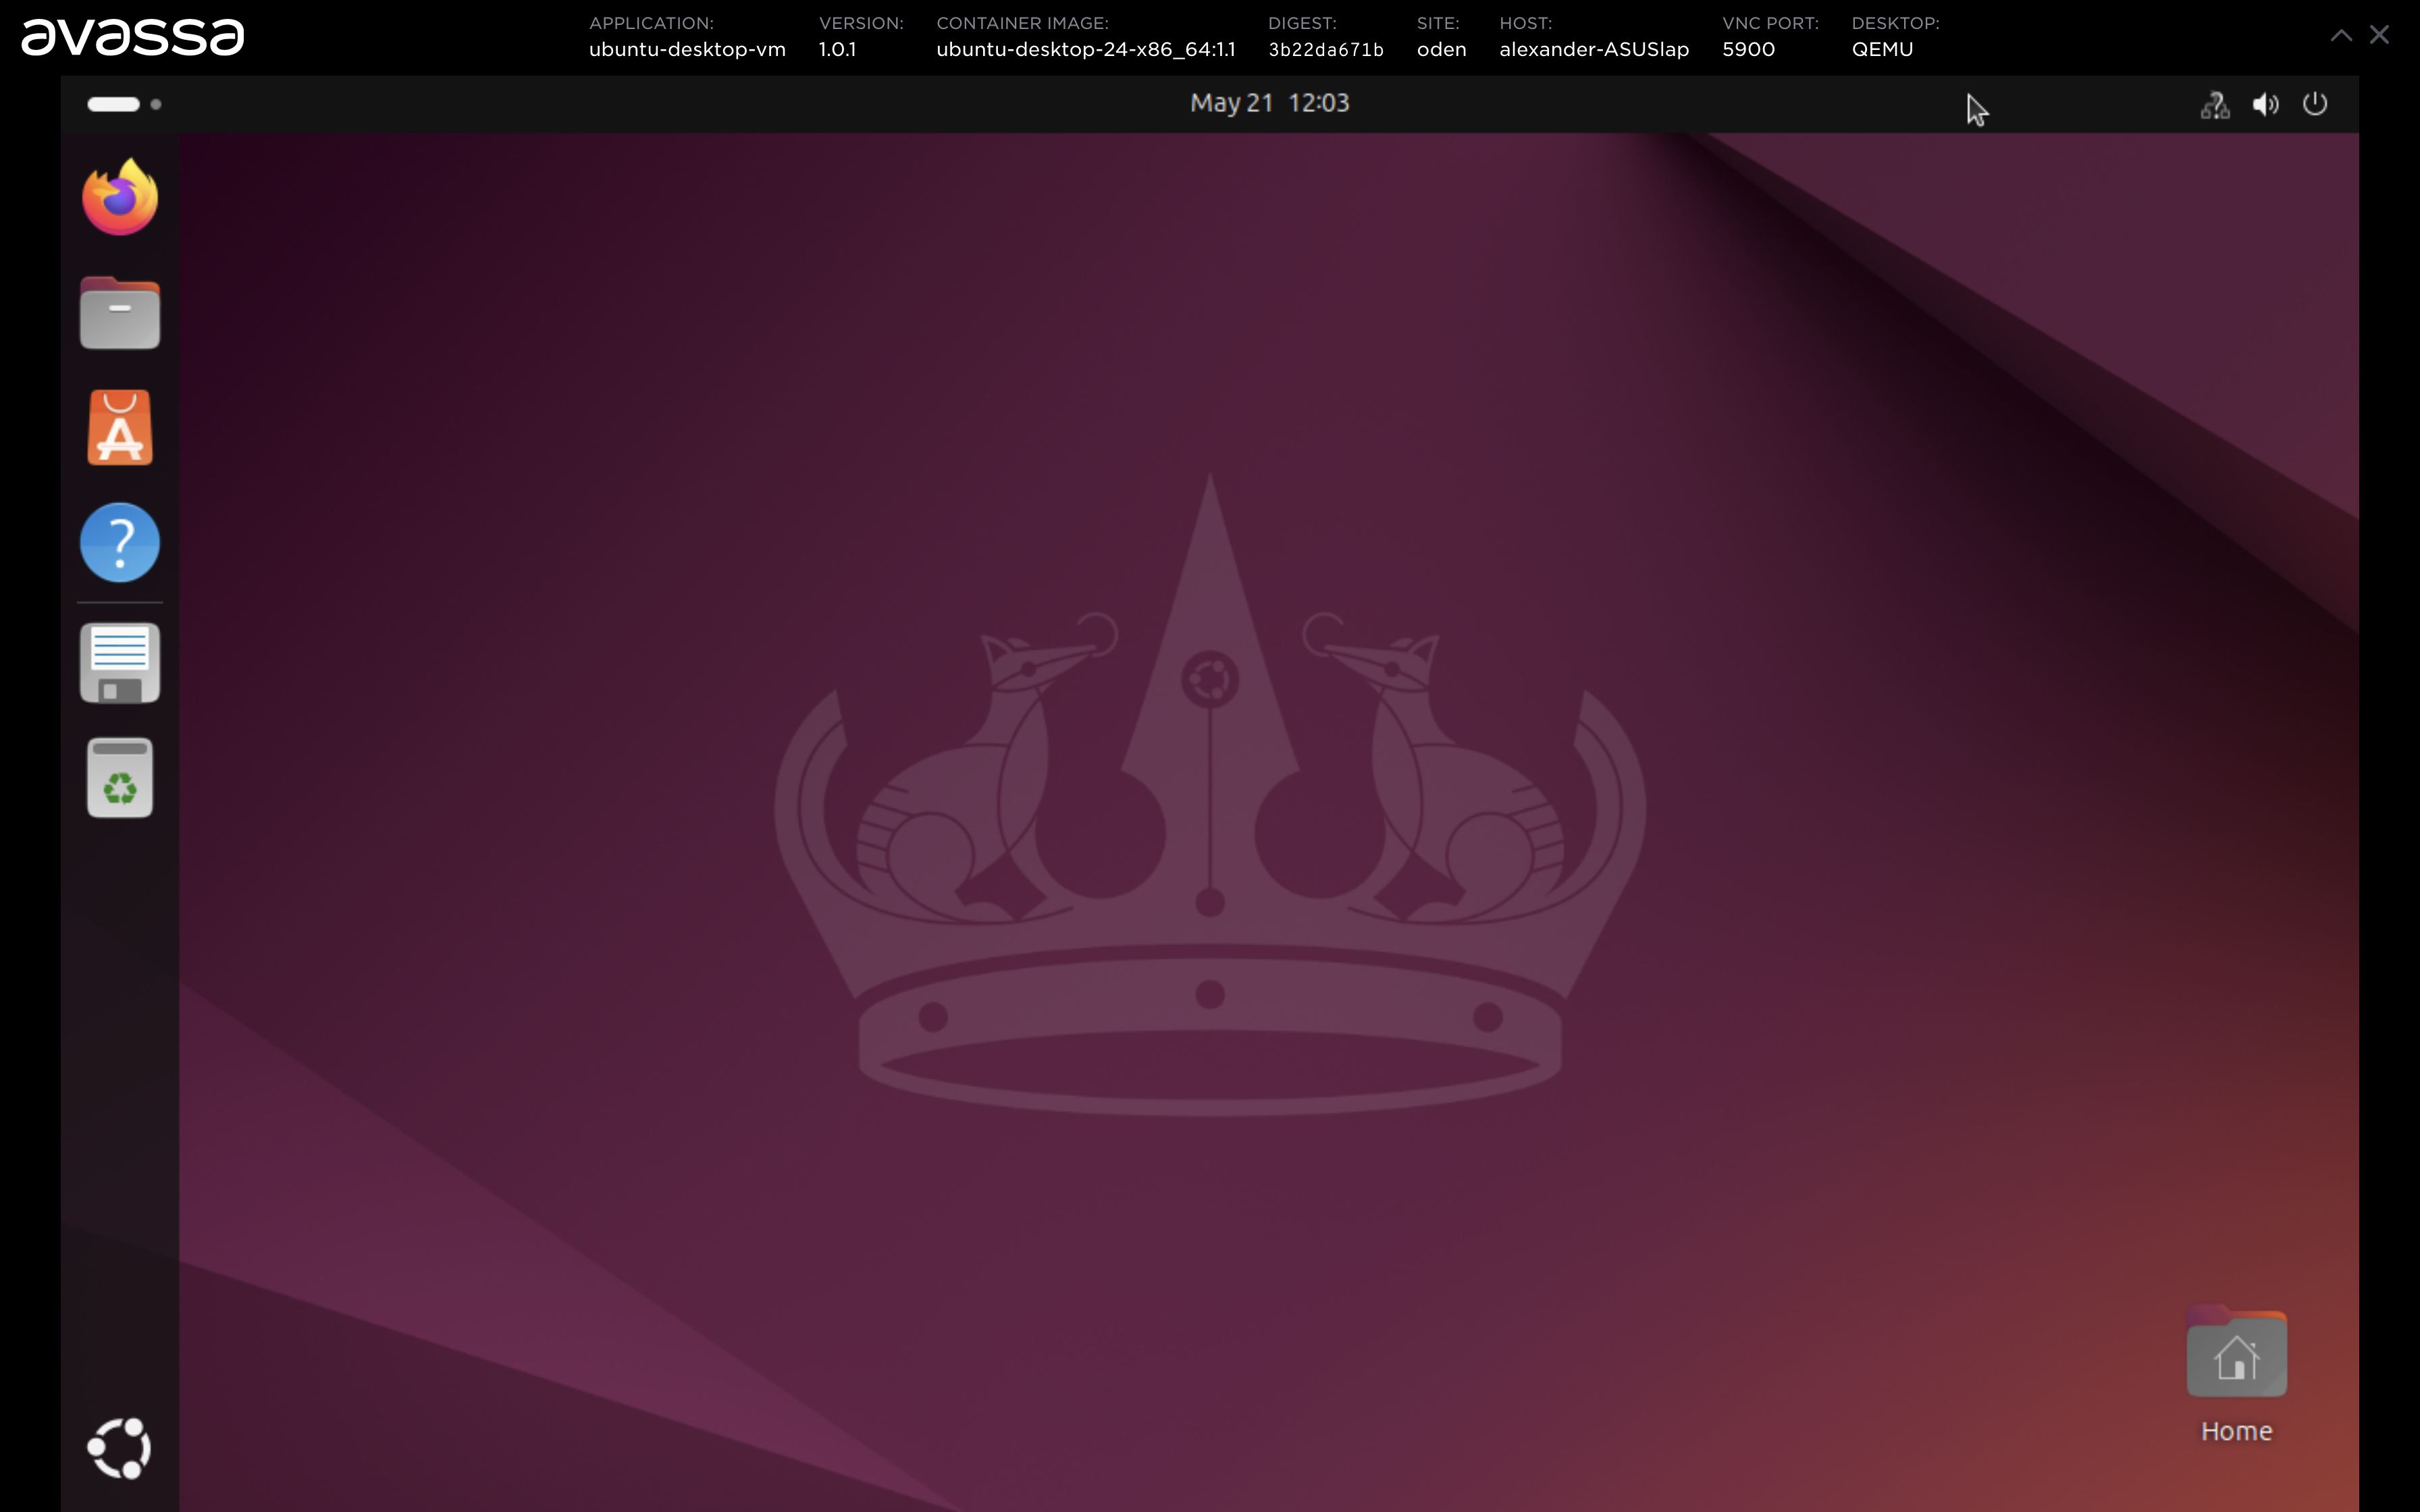
The menu for the VM also provides a menu item to start a VNC window towards the Ubuntu VM.
Debugging Virtual Machine
View information about the application, deployment status, ingress etc.
% supctl show --site local-edge applications ubuntu-server-app
name: ubuntu-server-app
version: 1.0.0
services:
  - name: ubuntu-server-service
    mode: replicated
    replicas: 1
    vm:
      name: ubuntu-server-vm
      container-image: avassa/ubuntu-jammy-server-amd64
      devices:
        device-labels:
          - kvm
          - tun
          - vhost-net
    ...
Start a shell in the linux instance that launches the VM and inspect the launch script etc.
supctl do --site local-edge applications ubuntu-server-app service-instances \
    ubuntu-server-service-1 vm-container exec-interactive /bin/sh
/vm # pwd
/vm
/vm # ls
cloud-init.sh      extra-images.sh    launch.sh          monitor.sh         pre-init-hook.sh   smp.sh
common-admin.sh    get-image-hook.sh  lua                network.sh         qmp.lua            uefi.sh
console.sh         image.sh           memory.sh          post-init-hook.sh  resize.sh
Connect to the VM's virtual console using supctl:
supctl do --site local-edge applications ubuntu-server-app service-instances \
    ubuntu-server-service-1 vm-container exec-interactive ./console.sh
Connect to the VM's QEMU monitor to inspect the information such as device tree and make runtime changes:
supctl do --site local-edge applications ubuntu-server-app service-instances \
    ubuntu-server-service-1 vm-container exec-interactive ./monitor.sh
Making USB Devices Available to Virtual Machine
Ensure that the container has access to the device using device-labels.
Modify the launch script to extract the vendorid and productid
for the device. For example,
VendorProduct=$(lsusb | grep "UC-2324 4xSerial" | cut -d ' ' -f 6)
VendorId=$(echo $VendorProduct | cut -d ":" -f 1)
ProductId=$(echo $VendorProduct | cut -d ":" -f 2)
We need to pass extra flags to the QEMU executable. In order to do this, mount
one of the optional hooks into the VM container and use the set command to
set the parameters as follows:
name: ubuntu-server-app
version: 1.1.0
services:
  - name: ubuntu-server-service
    ...
    volumes:
      - name: disk
        ...
      - name: hooks
        config-map:
          items:
            - name: pre-init-hook.sh
              data-verbatim: >
                set --
                -device qemu-xhci,id=xhci
                -device usb-host,vendorid=0x${VendorId},productid=0x${ProductId}
    vm:
      name: ubuntu-server-vm
      ...
      mounts:
        - volume-name: disk
          ...
        - volume-name: hooks
          files:
            - name: pre-init-hook.sh
              mount-path: /vm/pre-init-hook.sh
      ...