Deploy more advanced applications
This tutorial guides you through the steps to deploy more complex applications on the Avassa Platform. It adds on to the basic single-container, multi-site deployment covered in the first application tutorial.
It covers more features related to multi-container applications, and more advanced options related to edge application placement. It introduces the usage of the Strongbox distributed key-value store to manage application credentials.
If you did run through the previous tutorial, it is a good start to make sure you have deleted those application and deployment specifications.
All the code and artifacts used in the example are available in our public GitLab repository.
You can also learn more by looking at the application examples library where you can find more complete application specifications and deployment examples.
Check the status of the sites
To inspect the status of the sites, click Sites, and pick a site.
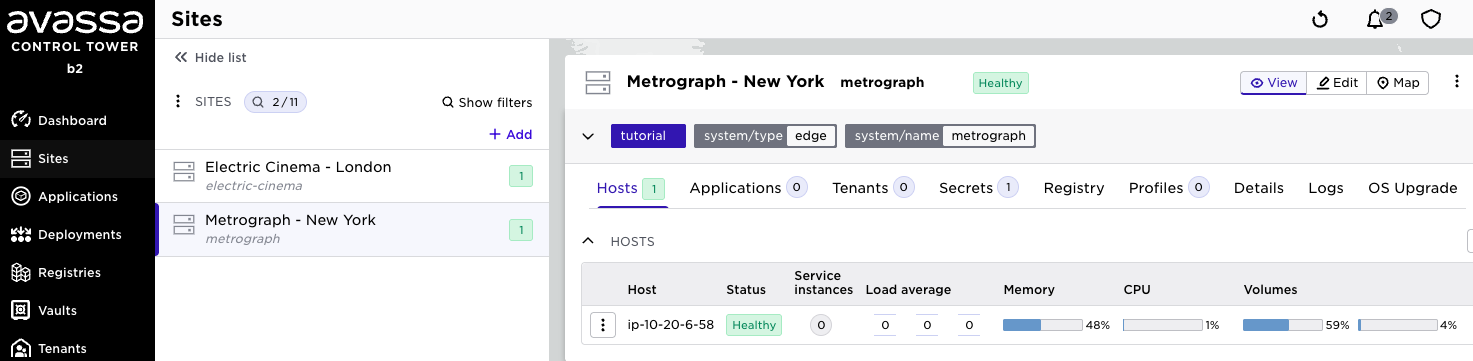
In the top you will see a status of the site as such. In the middle you see a list of all hosts on the site, in this case only one. And finally after selecting a host you will get information about the host.
Label sites for deployment
Containers are deployed based on site-label matching. You are going to place the popcorn-controller application on the sites located in Europe only, so you need to add a label to the Electric Cinema - London site.
Click Sites, pick Electric Cinema - London, and choose edit by clicking the pen (edit) icon top right.
Click New label and add a label named region with value europe.
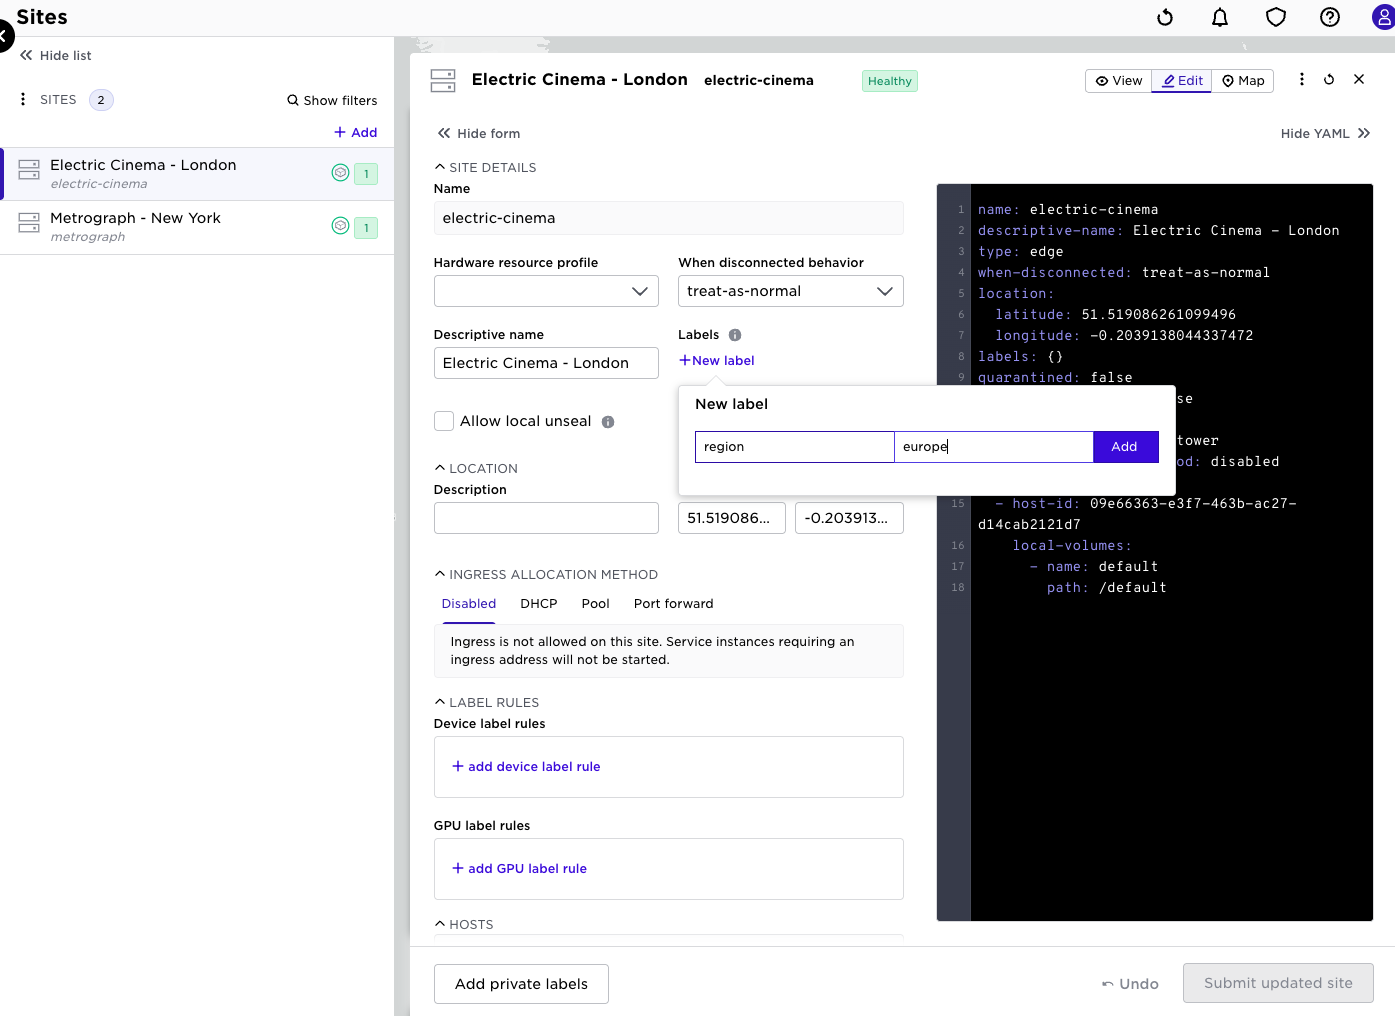
Do not forget to save the changes by clicking Submit.
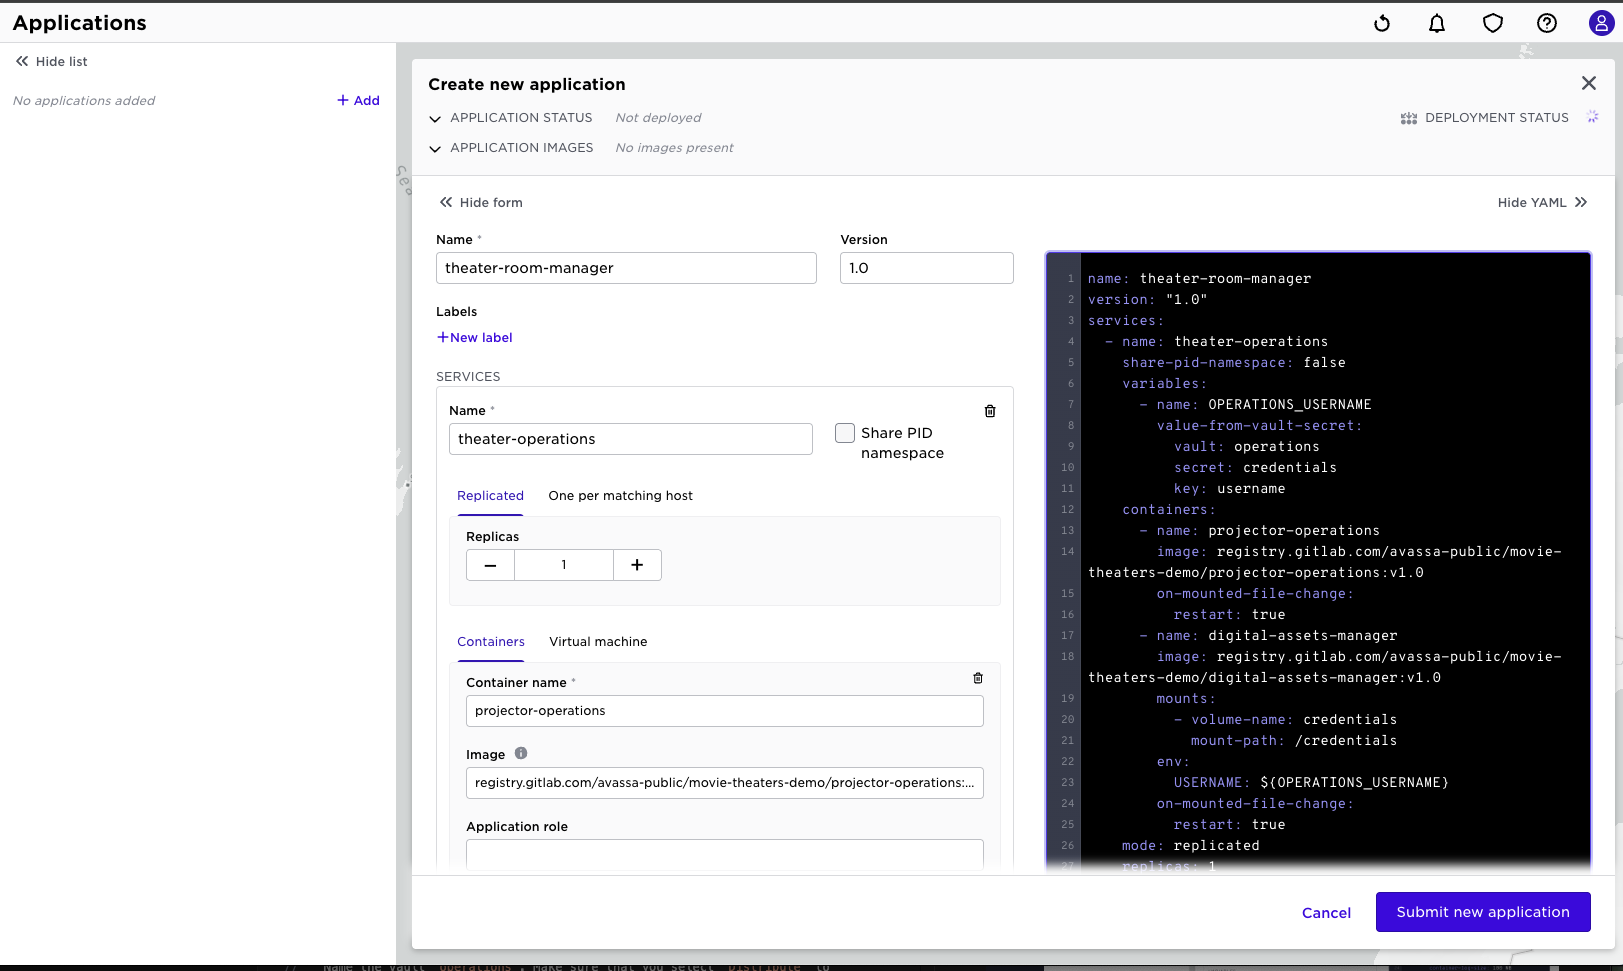
Register the application
To deploy applications, you need to register the following for each application:
- An application specification that defines the structure and content of an application
- A deployment specification that defines where the application shall be deployed
In this tutorial we define a theater-room-manager application with two services:
- A
projector-operationservice consisting of two containersprojector-operationsanddigital-assets-manager - A
curtain-controllerservice consisting of a singlecurtain-controllercontainer
Click Applications in the sidebar and click Add.
Paste the following into the YAML form field and click Submit to add the theater-room-managerapplication.
name: theater-room-manager
version: "1.0"
services:
  - name: theater-operations
    share-pid-namespace: false
    variables:
      - name: OPERATIONS_USERNAME
        value-from-vault-secret:
          vault: operations
          secret: credentials
          key: username
    containers:
      - name: projector-operations
        image: registry.gitlab.com/avassa-public/movie-theaters-demo/projector-operations:v1.0
        on-mounted-file-change:
          restart: true
      - name: digital-assets-manager
        image: registry.gitlab.com/avassa-public/movie-theaters-demo/digital-assets-manager:v1.0
        mounts:
          - volume-name: credentials
            mount-path: /credentials
        env:
          USERNAME: ${OPERATIONS_USERNAME}
        on-mounted-file-change:
          restart: true
    mode: replicated
    replicas: 1
    volumes:
      - name: credentials
        vault-secret:
          vault: operations
          secret: credentials
  - name: curtain-controller
    share-pid-namespace: false
    containers:
      - name: curtain-controller
        image: registry.gitlab.com/avassa-public/movie-theaters-demo/curtain-controller:v1.0
        on-mounted-file-change:
          restart: true
    mode: replicated
    replicas: 1
If you read through the YAML specification of the theater-room-manager application you can see references to "secrets" and "credentials". This example illustrates the distribution of secrets to the applications on the edge sites. In the Control Tower you can create "vaults", each vault in turn can have several secret stores. Each store, finally, manages key/value pairs. Avassa makes sure these secrets are distributed to the right edge applications in a secure way.
A brief introduction to secret follows here. The environment variable OPERATIONS_USERNAMEwill pick a value from vault:operations, secret:credentials, key:username. Further down you can see that the container projector-operationswill mount the secrets as files, one file per key/value pair.
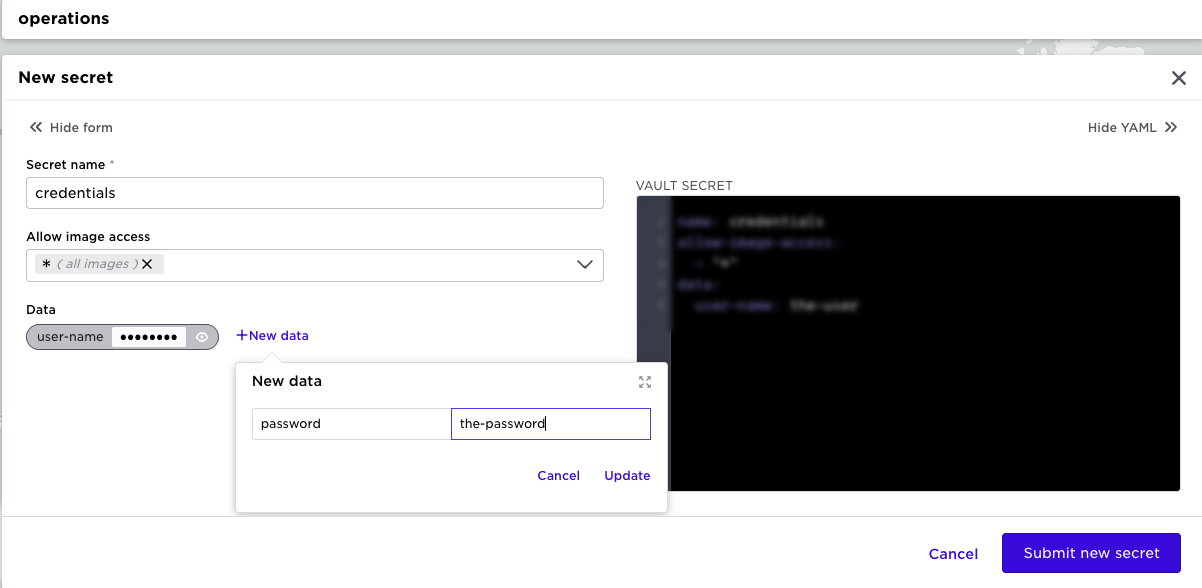
Add a distributed vault for credentials
To distribute credentials through the distributed encrypted key-value store, you must first create a named vault with a key-value map to store the username and password-pair.
Click Vaults in the sidebar, then click Add.
Name the vault operations. Make sure that you select Distribute to all.
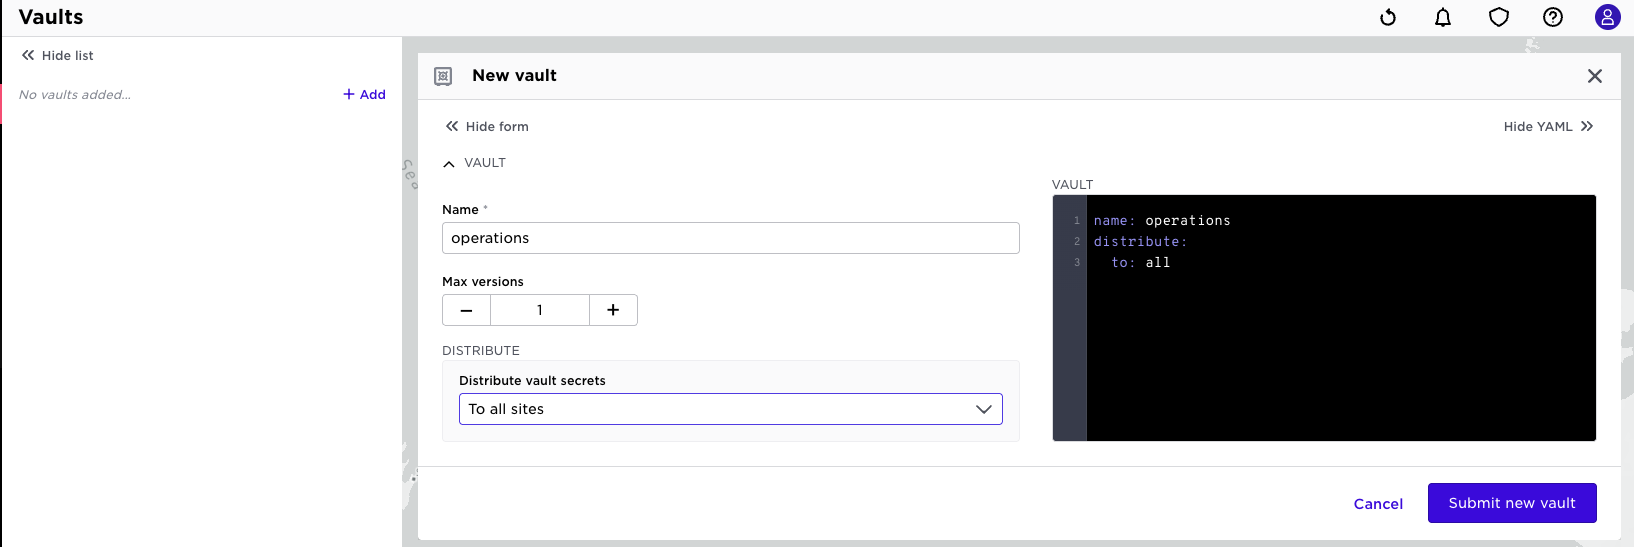
Now, add a new secrets map named credentials.
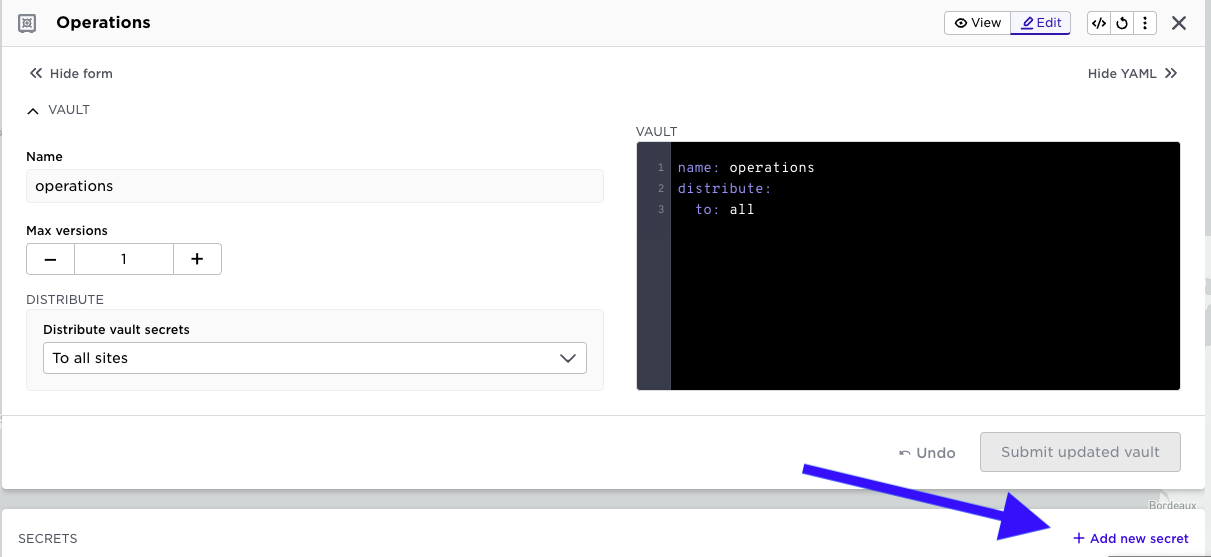
Add two key-value pairs username: the-user, and password: the-password in the data section. Finally, save the new vault.
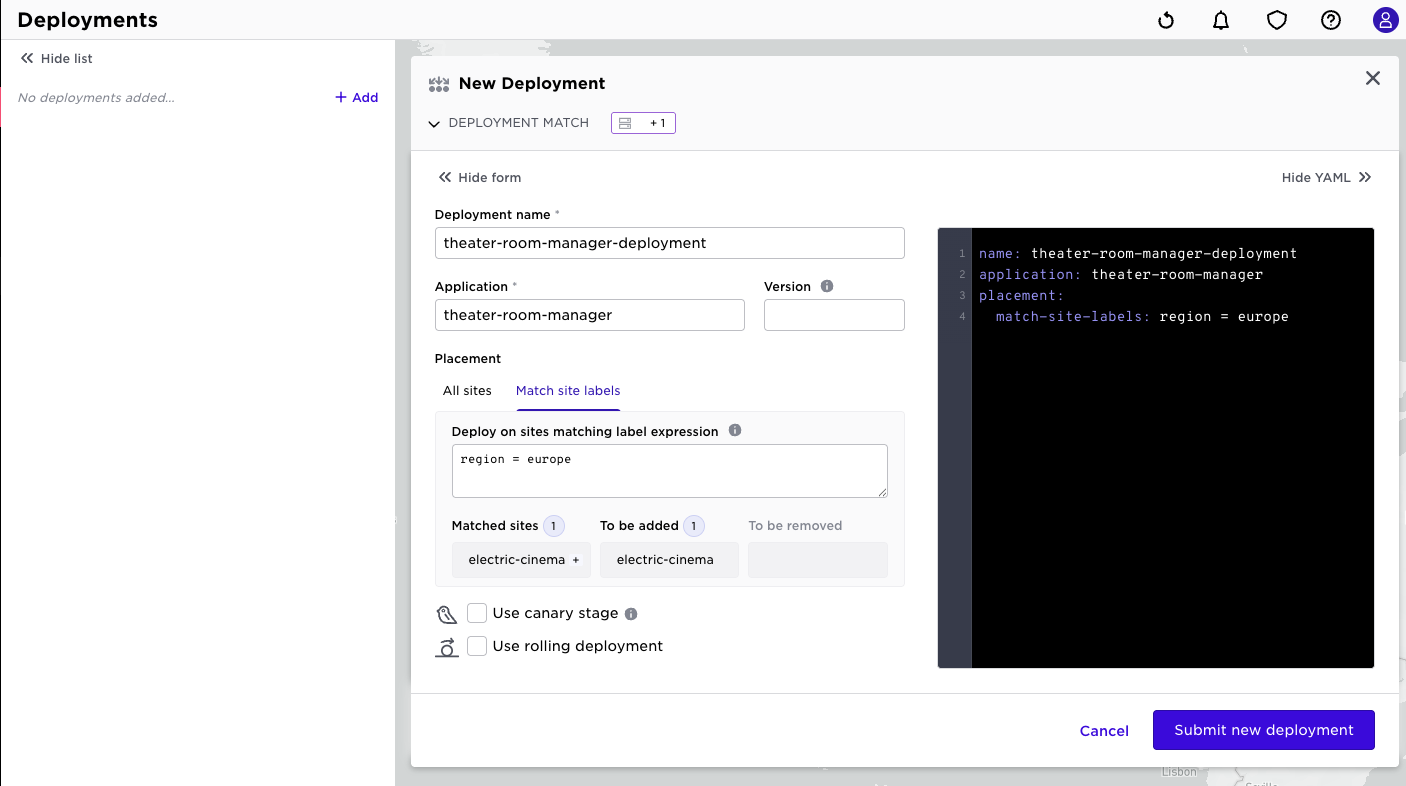
Deploy the application
Click Deployments in the sidebar, and click Add.
Replace the default content with the following and click Submit to deploy the heater-room-manager application to all sites you labeled to be in the Europe region.
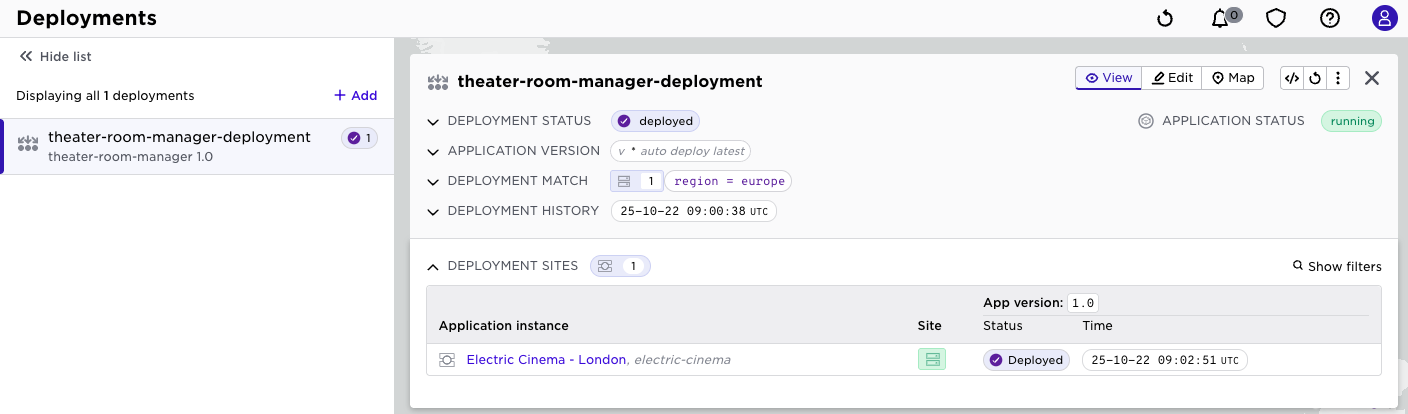
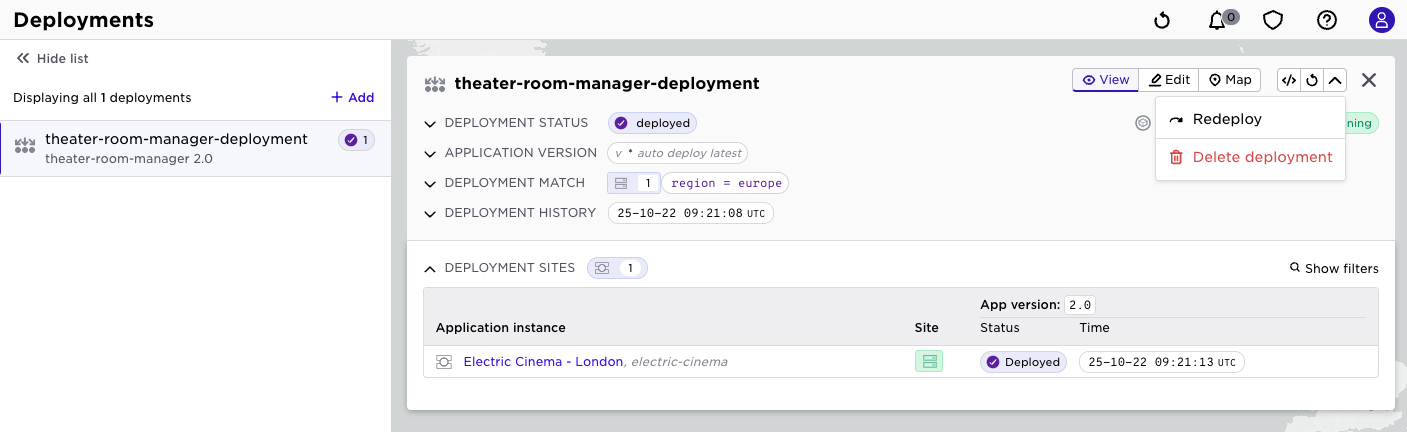
Your list of deployments should now look like:
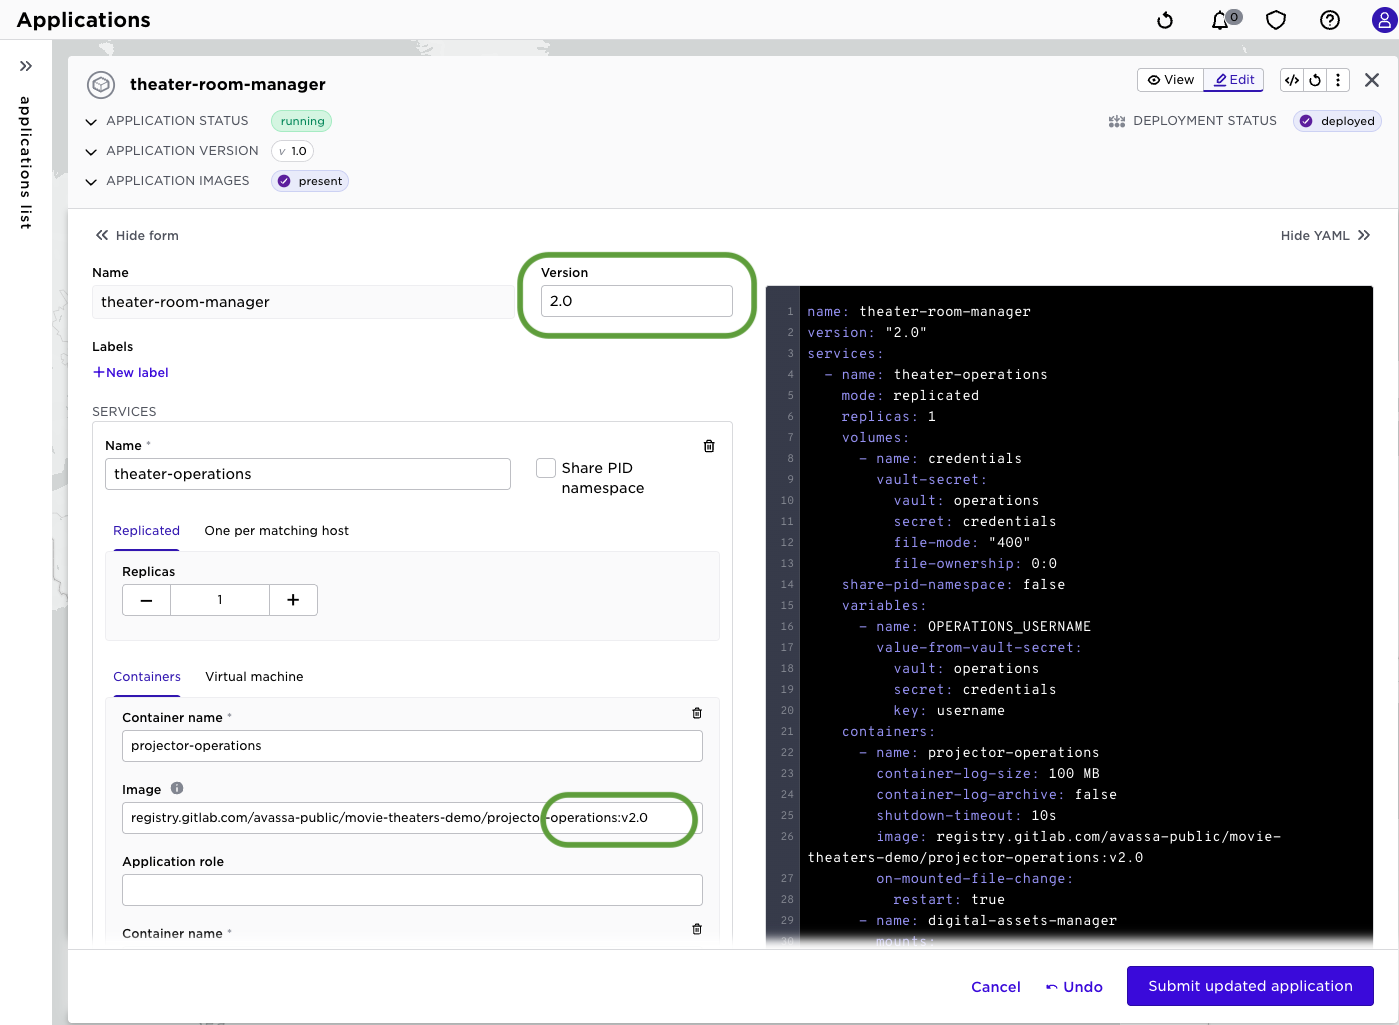
Update the container version in an application
To update the version of a container that is part of an application, you need to update the version tag on the application, and the image tag on the specific container in the service.
Click Applications in the sidebar, select theater-room-manager, and click the ✏️ icon to edit.
Modify the current application specification:
- Change the application version to 2.0
- In the
projector-operationscontainer, change the image path toregistry.gitlab.com/avassa-public/movie-theaters-demo/projector-operations:v2.0
and click Submit.
This created a new version 2.0 of the application specification. 1.0is still available for use. In your deployment you have two options when it comes to application versions:
- always run latest, specify
*in the version field - reference explicit version
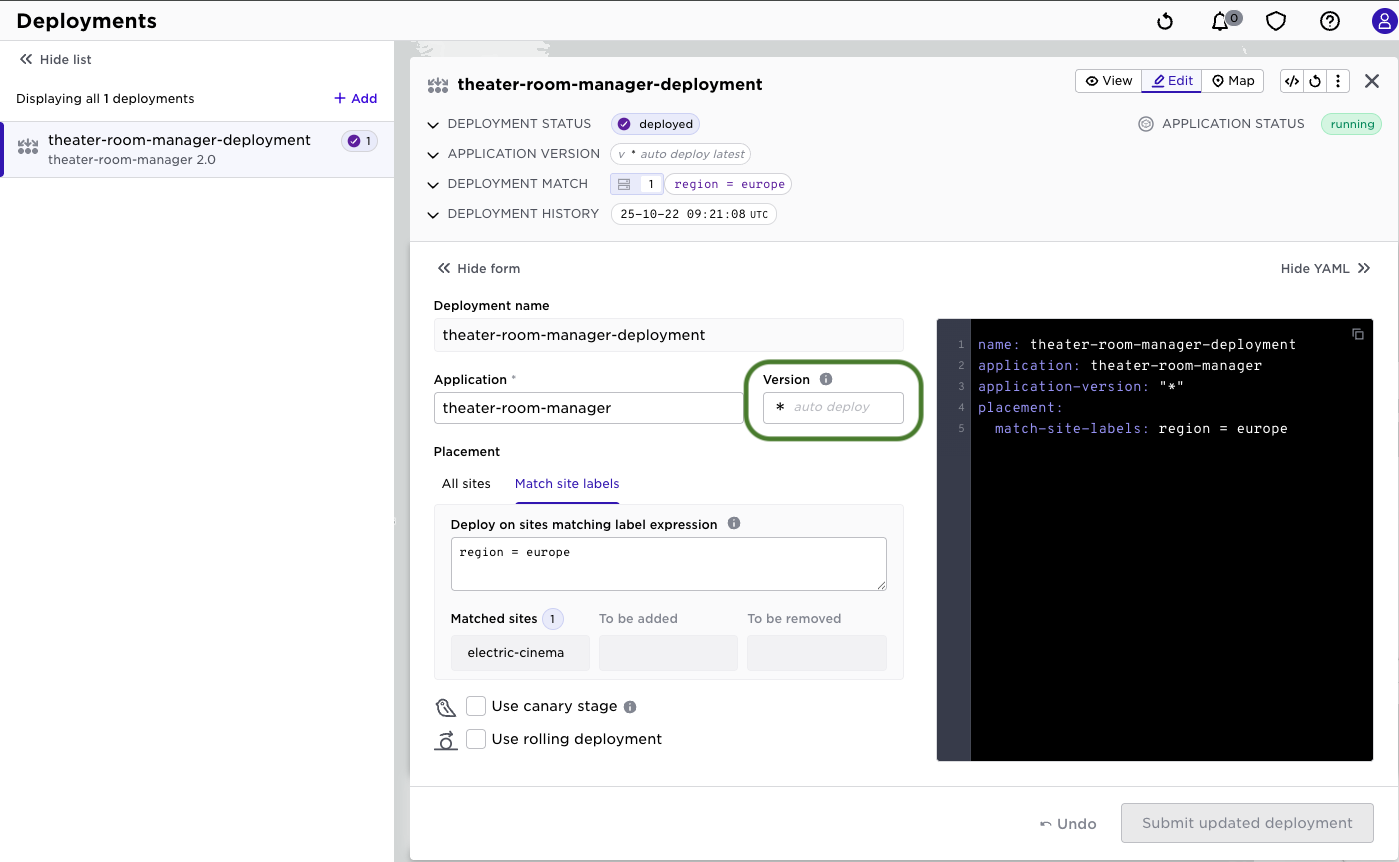
This triggers an update of the version on the matching edge sites. This is an illustration of the declarative mechanisms in Avassa. You do not have to perform explicit imperative actions. The application and deployment specifications are constantly matched as desired state versus the actual state on the edge sites. Any discrepancy will make the Avassa system to perform minimum operations to have the desired state move towards desired state. This greatly simplifies operations and integrations to CI/CD environments. You just have to update the application or deployment specification and things happen.
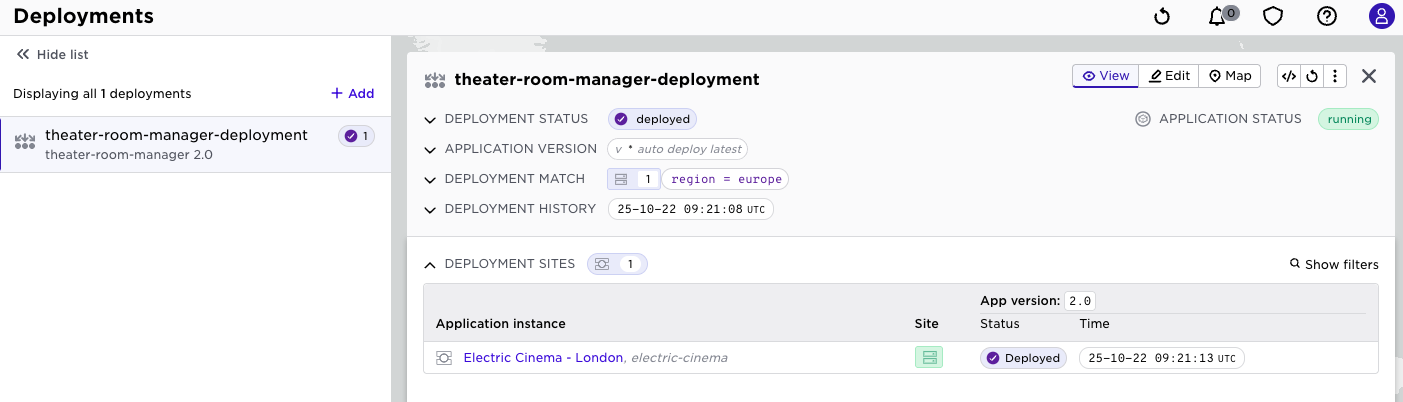
If you now check the deployment details you will see version 2.0. (If you are quick you will see the 1.0 to 2.0 upgrade happen in the UI)
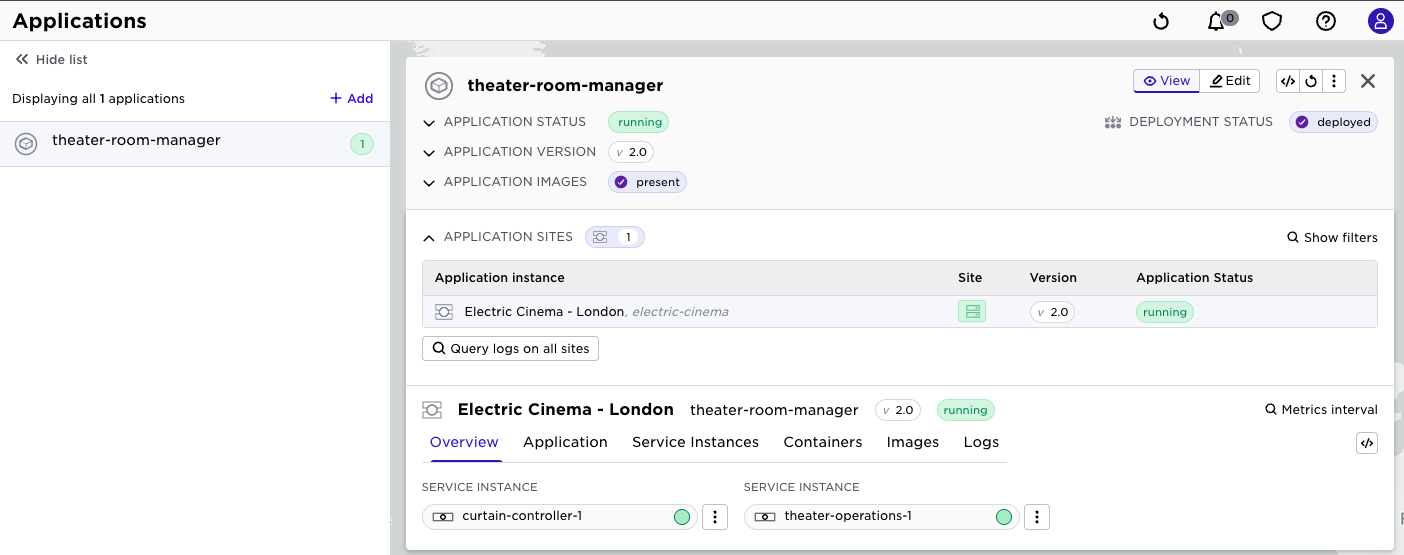
Check the status of the updated application
To inspect the status of the updated applications, click Applications, select theater-room-manager. Click the 👁 icon (view) in the top right if you are still in editing mode.
The 2.0 version tells you that the deployment has been updated according to the new application specification.
Undeploy the application
To remove all instances of an application you need to remove their matching deployment specification.
Click Deployments in the sidebar, select the Delete deployment menu item.
Conclusion
You have now deployed, updated and undeployed one simple and one complex application across different sets of sites, using label-matching for placement and using a distributed, encrypted key-value store for application credentials.